This new Megaladata release expands the platform's integration and UI capabilities and enhances information security. Megaladata Integrator now includes an MCP server. New authentication and autorization...
Job Scheduler


Megaladata server editions, starting with version 7.2, have a built-in job scheduler. This tool allows analysts to independently schedule tasks and automate work processes. The scheduler offers convenient mechanisms for setting up jobs, logging the execution process, and monitoring processing.
Batch mode is a variant of workflow execution without displaying the user interface and outputting messages to the screen. Typically, the result of such work is generating final datasets and loading them into a third-party system, for example, a data warehouse or an accounting program.
Megaladata offers two ways to configure batch execution of workflows: using the BatchLauncher utility or the job scheduler. In both cases, a server edition of the platform is required: Team, Standard, or Enterprise. The reason is, desktop applications interact with the user via a graphical interface, while batch execution requires a constantly running service that responds to batch launch commands.
To use BatchLauncher, you need to generate a correct command line. Despite the labor-intensive setup, this method can be preferable for projects where process automation is implemented using scripts, such as DevOps, CI/CD, or autotesting.
Unlike BatchLauncher, which requires command line configuration, the job scheduler offers a simpler and more intuitive interface. It is aimed at self-service use by analysts, allowing them to configure complex ETL or ELT data collection processes, as well as AI model training scenarios, without involving the IT department and writing code. Configuration is carried out interactively without the need to use scripting languages.
Setting up rights
First, the administrator must grant the user the "Batch processing" role. This can be done in Administration → Users. If you enable the "Access to all scheduler jobs" option, the user will also be allowed to edit and delete jobs created by other analysts.

Figure 1: Edit user
Setting up a job
After configuring the rights, the user can independently create jobs, set parameters, and define variables. They will also have access to a log containing information about active and completed jobs.
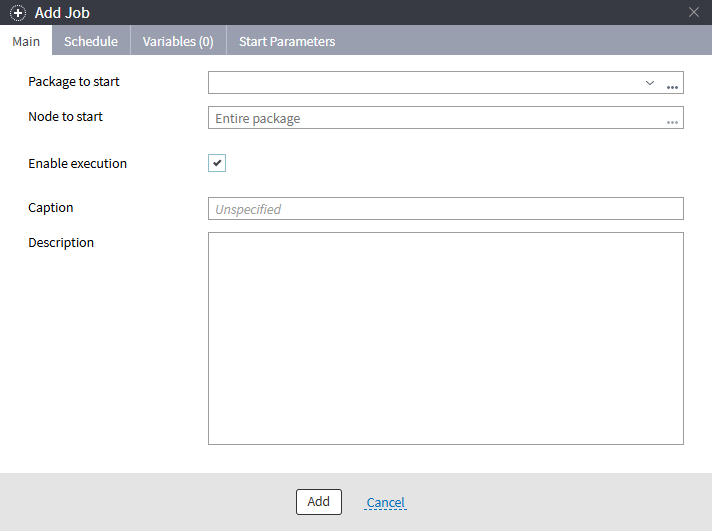
Figure 2: Add a job
When setting up a job, the following parameters can be configured:
Main Parameters:
- Package to start: This can be entered manually, selected from a list of open packages, or chosen via the open file dialog box.
- Node to start: The name or GUID (Global Unique Identifier) of the node to execute. If not specified, the entire package will be run.
- Enable execution: A flag that can be used to temporarily prevent the package from running.
- Caption: A user-friendly name for the task. If not specified, it will be generated automatically based on the file name.
- Description: Custom notes or details about the job, added into a special multi-line comment field.
Schedule Parameters:
- Start: Date and time of the first launch.
- Repeat: A checkbox indicating whether the task will be executed regularly. If disabled, the task will be executed once.
- Repeat every: The time interval in milliseconds, seconds, minutes, hours, days, weeks, or months. The minimum interval allowed is 10 milliseconds.
- End: The time after which the job will not be started.
- Additional filters: Filters to configure execution by days of the week, days of the month, and months. Instead of specifying a day, you can use the option Last day of the month.
Variables: Set the values of variables created in the package when designing workflows.
Start Parameters:
- Start immediately if the start was skipped.
- Skip the start if there is an active session.
- Retrain models upon the start: Specifies whether machine learning models should be retrained provided that this option is enabled in the relevant workflow nodes.
- Save package after retraining.
- Log count limit: A limit on the maximum number of logs. When this limit is reached, older records can be deleted. Additionally, logs are cleared when the Megaladata Server starts up.
The system tries to run jobs at the scheduled time, but under high CPU load, packages may be launched with a slight delay, so the exact launch time is not guaranteed. If a very short period is set (i.e., less than one second), some scheduled launches may be missed.
The logic of periodic execution is as follows. The start time is determined based on the values in the "Start" and "Repeat every" fields. The system checks whether this start time does not exceed the end date and satisfies additional filters (e.g., days of the week, dates, and months). For example: If you set the job to start on January 1, 2024, at 8:00 AM, with a repetition interval of 1 day, but excluding Saturdays and Sundays, the job will execute every weekday morning until the specified end time.
Jobs also have properties that are not configured, but are generated by the program automatically:
- Owner (the user who created the job)
- Previous start time
- Next start time
- Modification time
Selecting a package or node
Jobs can be configured not only in the scheduler, but also when working with the file storage, viewing the list of packages, or designing a workflow.
To set up a job from the file storage:
- Select the package.
- Right-click it and select "Add job to scheduler".
A job editor window will appear with the "Package to start" field filled in. Make the necessary adjustments and save the job.
If you don’t need to run the entire package but only a specific node, it's best to do this directly from a workflow. To do so:
- Select the desired node.
- Right-click it and choose "Add job to scheduler".
When you do this, the fields "Package to start" and "Node to start" will be automatically filled in in the job editor.
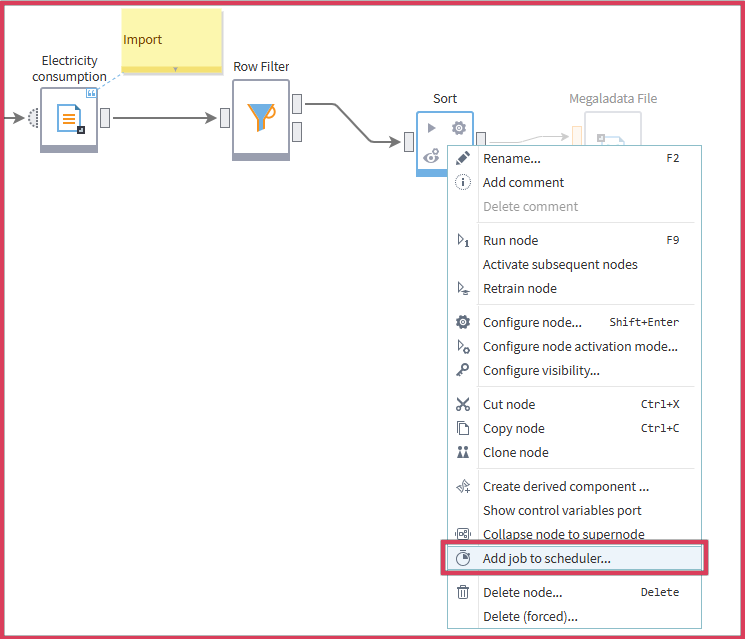
Figure 3: Setting up a job from a workflow
The “Node to start” field specifies the node's GUID. However, if you selected Open or Published when configuring visibility, you have probably set a name for the node. In this case, the “Node to start” field will display the node's name rather than its GUID.
When you do this, the fields "Package to start" and "Node to start" will be automatically filled in in the job editor.
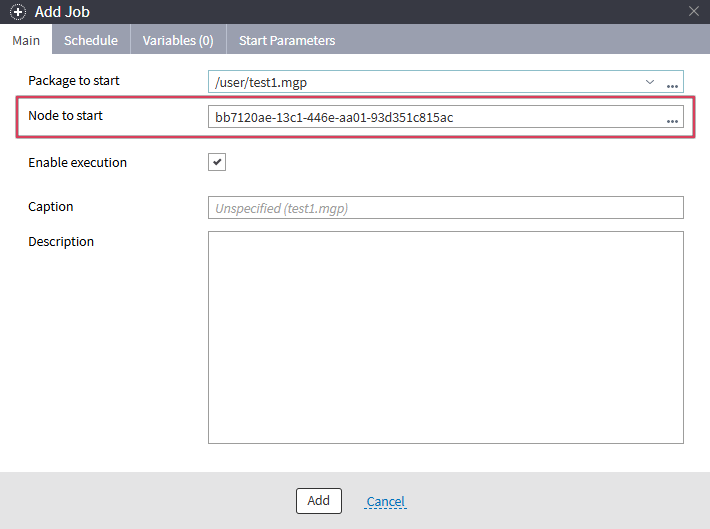
Figure 4: Setting up a job to run a node
Execution log
In the scheduler, you can view all job execution sessions: active and completed, for one job and for all at once.
When you do this, the fields "Package to start" and "Node to start" will be automatically filled in in the job editor.
Figure 5: Execution log
When a package is running for a long time, you can monitor the processing progress and, if necessary, force the job to stop.
Job configuration conflict
One of the common errors encountered when working with the scheduler is "Node {...} not found". This issue often arises because the job has been configured, but the package that is supposed to be executed has not been saved to disk.

Figure 6: Error
The error occurs if the job is configured for a node in a package that was loaded into RAM but not saved to disk. When running the job, Megaladata reads the package from the file storage, does not find a node with the specified GUID, and displays an error. To avoid this, save the package to disk before configuring the job.
Conclusion
The job scheduler is a simple way to set up task execution and automate work processes. The analyst can configure everything independently, without writing scripts or performing any operations on the server. Convenient mechanisms for setting up variables, creating a schedule, and monitoring launches make the scheduler accessible to a wide range of users.
See also

Megaladata 7.4.1 Release Notes

Megaladata at the Plug and Play Italy Summit in Milan
On June 16th, Megaladata participated in the Plug and Play Italy Summit, held in Milan, an event bringing together startups, investors, and key players in the international tech ecosystem.
 influences the decision-making process in 2026")
How data analysis (still) influences the decision-making process in 2026
In 2026, the phrase "data-driven" feels outdated. With the rapid evolution of agentic AI, autonomous software agents are no longer just analyzing charts; they are executing complex workflows, triggering...
About Megaladata
Megaladata is a low code platform for advanced analytics
A solution for a wide range of business problems that require processing large volumes of data, implementing complex logic, and applying machine learning methods.
GET STARTED!
It's free