Working with Databases in Megaladata


The simplest way to work with data in Megaladata is to use files. Their use has significant advantages: minimum settings, no need for additional software, etc. However, there are also disadvantages, such as: limited functionality of import/export mechanisms, lack of multi-user access, and security issues.
If the capabilities of files are insufficient, you can employ databases. They allow a large number of users to work simultaneously, offer advanced mechanisms for access rights differentiation, have integrity mechanisms, etc.
Megaladata supports the following databases:
- MS Excel Connection
- Firebird Connection
- Interbase Connection
- MS Access Connection
- MS SQL Connection
- MySQL Connection
- Oracle Connection
- PostgreSQL Connection
- SQLite Connection
- ClickHouse Connection
In addition, working with sources via ODBC is supported .
To work with a database in Megaladata, you need to configure the connection first. This makes it easier to use the same connection for both importing and exporting data within a package.
Let's explore database interactions within Megaladata using PostgreSQL as an example. PostgreSQL is a widely used, open-source database management system (DBMS) available for various operating systems.
Connection
First, you need to create a connection that contains all the necessary settings: password/login, data source location, and database parameters.
To create a PostgreSQL connection:
- Click on the navigation icon and then connections.
- Add the PostgreSQL component to the workspace (double-click it or drag and drop).
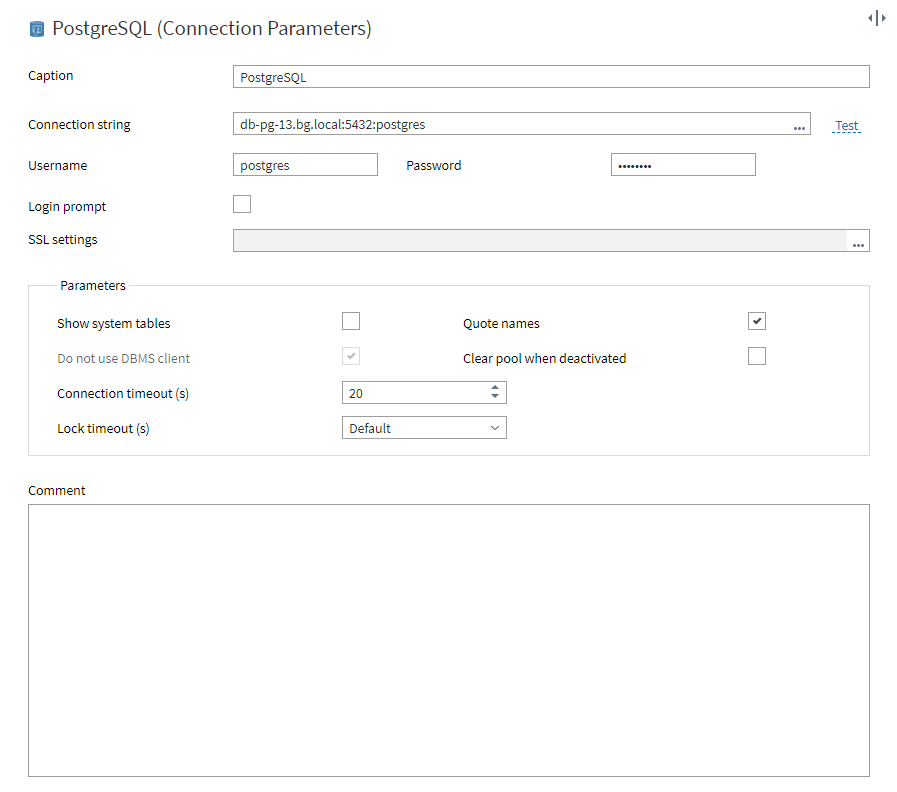
- In the connection field, specify the server host, the TCP port, and the database, separating them with colons (for example, db-pg-13.bg.local:5432:postgres).
- Enter the login and password of the database user.
- Test the connection (use the Test button). If it is successful, save it or click Connect to activate the connection right away.

Figure 1 : Connection parameters
A common mistake when configuring connections is not specifying a database after having entered the host and port data. Megaladata won't be able to connect in this case, so make sure you enter all the necessary data.
Reusing a connection
Usually, companies stick to a few main databases that everyone uses. So, it's a good idea to set up the connection once and just reuse it, instead of doing it again for every new employee.
To do this, you can create a package containing no workflows but only configured connections. Set the Public visibility for the connection nodes and save the package to a location accessible to everyone, such as a shared folder in the file storage.
Users can now access preconfigured database connections within this package to simplify their workflows.
Importing data
After setting up the connection, you can import data from the database:
- Go to the Workflow area (through the Navigation menu or the address bar).
- Open the Connections tab, select the connection you have configured, and add it to the workflow area (see the details below).
- In the Components tab, select the Database component in the import section and drag it to the workflow area.
- Link the connection ports of the PostgreSQL and Database nodes together.
To add a Connection to the workflow, right-click it in the Connections tab and choose one of the options:
- Add reference to connection into workflow
- Add connection node to workflow

Figure 2 : Add a connection
If you add a reference, your workflow will use a preconfigured connection to access the database. You won't be able to change the connection settings in the workflow.
To modify settings (e.g., username, password), use a connection node. This will allow you to access the configuration wizard for adjustments.
In the Database import node wizard, you can choose a table or execute a SQL query query. If the connection has been activated, you will see a list of the database's tables/views. If the connection is not activated, click Activate next to the connection field.
When importing data from a table, you can import all fields or select specific ones.
Note: Using the "Extract all" button and checking the box to select all fields may provide different results:
- Extract all: This option imports all fields from the table, regardless of any structure changes. If you add or remove fields, the import will still work correctly.
- The checkbox to check all fields: This option imports only the selected fields. If you modify the table's structure (by adding or removing fields), you might encounter import issues. For example:
- Newly added fields won't be included in the import.
- If you delete a previously marked field, the import may fail or omit that data.
To sum up: The first option imports all the table's fields, while the second one serves for importing all the marked fields.
Importing using SQL query
You can also use an SQL query for importing. The wizard has built-in mechanisms to help you write a query. For example, pressing CTRL+Space will display a list of available functions, fields, etc.
When writing queries, you can use variables. They are passed through the variable input port, and you can insert them using ":name" as a parameter (then the variable type will be taken into account) or the macro substitution "%name%".
Parameters using ":" are restricted to the WHERE clause. Macro substitution, however, allows inserting variables directly into the SQL query as string fragments. This way, you can insert a table name, or any other fragment, or even a complete query text.
Macro substitution provides more flexibility, but requires more careful use because it is easier to make a mistake.
Exporting data
You can use the configured connection not only for importing, but also for exporting data:
- Select the Database component in the Export section and add it to the workflow.
- Link the PostgreSQL connection nodes to the Database export nodes.
- Link the dataset to be exported to the Database export node.
- Open the configuration wizard of the Database export node.
- In the database export settings, select a table name or create a new one.
- Select export type.
- Map source columns to table fields and save.
When exporting data, the following options are available:
- Append data to table: Adds rows from the source table to the selected database table.
- Clear table and append data: Empties the database table and then fills it with rows from the exported table.
- Delete records by key field: Allows you to select a key field. Records matching this key will be deleted from the database table during the next step, Adjustment of columns mapping. In this case, no data is exported.
- Delete records by key field and insert data into table: Similar to the previous option, but after deleting records based on the key field, rows from the source table are added to the database table.
- Update existing table records: Lets you select a key field. Records matching this key in the database table will be updated with data from the source table.
Transaction commit frequency (rows): If there is a lot of data, this setting allows you to divide the export process into multiple smaller transactions. Each transaction commits after processing a specified number of rows. If this value is left blank, the entire export will be treated as a single, large transaction.
Creating a table in a database during export
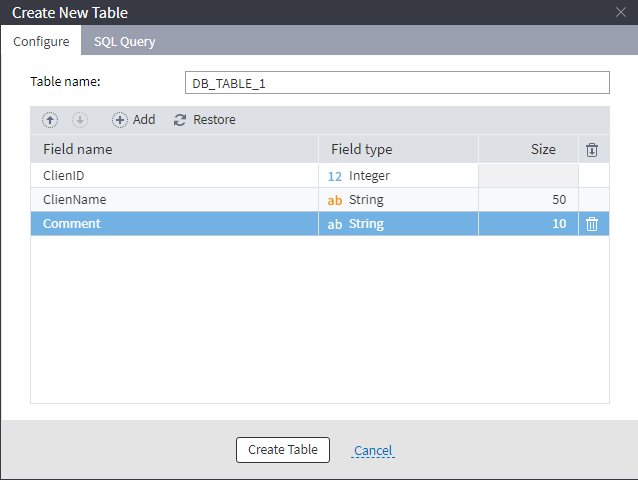
There is an option within Megaladata to create a table in a database. The user does not need to use third-party software to create a table and fields, but must have rights to perform this operation in a database.
To create a table when exporting data:
- Go to the settings of the Database export node.
- Select "Create table".
- Enter the table name.
- Add necessary fields and set up their type and size.
- Click "Create table".

Figure 3: Create a table
Conclusion
Megaladata provides convenient mechanisms for working with databases:
- Support for popular DBMS, including ODBC sources.
- Setting up and reusing connections.
- Import of tables, with the ability to generate SQL queries.
- Several options for data export.
Access security is ensured by DBMS tools, which have mechanisms for delimiting rights.
See also


