On July 17-19, 2026, Megaladata took part in e-Logi Fest 2026, Armenia's leading international event dedicated to logistics, e-commerce, and supply chain innovation.
Logging into Megaladata with OpenID


In modern corporate information systems, centralized access management and secure user authentication are crucial. Configuring Megaladata login through OpenID Connect, with Keycloak as an authentication server, is a convenient and secure solution.
Megaladata is widely used in corporate information systems due to its flexibility and extensive functionality. This makes the platform a key tool for working with data in large companies.
One of the critical aspects of corporate solutions is security. Modern IT infrastructures must meet strict information security requirements, provide centralized access control, and support flexible authentication and authorization mechanisms.
OpenID Connect (OIDC) is one such mechanism. This technology allows for secure integration of Megaladata into a corporate environment, providing single sign-on (SSO) and centralized access management while eliminating the need to store passwords in the system itself.
Read on to see how to set up Megaladata login via OpenID Connect using Keycloak as an authentication server.
Authentication and authorization in Megaladata
First, let's consider the basic principles of authentication, authorization, and access control in Megaladata.
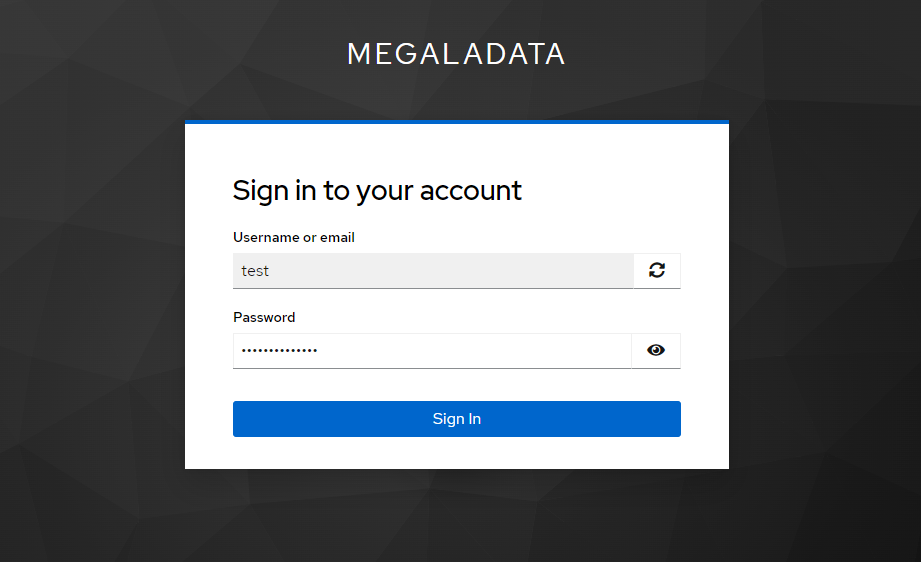
When a user opens the Megaladata start page in a browser, they see a login screen:
Megaladata login screen
After the user fills in the required data, the following processes occur:
-
Authentication: This is the first step. After entering the login and password, the system checks if the user is registered. If so, Megaladata "recognizes" the user and gives them access to the system. The Megaladata administrator is responsible for registering and, if necessary, blocking users.
-
Authorization: After identity verification, the system determines the user's rights—that is, which operations and data are available to them. This creates a comprehensive picture of the user's capabilities in Megaladata, including restrictions on access to certain sections or resources. This is facilitated by the role model defined in the system by the platform administrator.
In brief, while authentication identifies the user by asking "Who are you?", authorization intends to answer the question "What are you allowed to do?".
What is OpenID Connect and OAuth 2.0?
Megaladata's authentication and authorization mechanism is a standard solution available to all users of server editions. In this case, accounts are stored in the internal storage of the Megaladata server and are reliably protected.
However, for Megaladata's Enterprise edition, advanced authentication mechanisms are available:
- OpenID Connect + OAuth 2.0 (hereinafter referred to as OpenID): Allows you to integrate Megaladata with external authentication and authorization systems, providing single sign-on (SSO).
- LDAP (Lightweight Directory Access Protocol): Used to store and manage accounts, groups, and permissions in centralized directories such as Active Directory or OpenLDAP.
These mechanisms allow centralized access management and flexible user rights configuration in line with corporate security standards.
OpenID Connect
Before a user can be granted access to the system, their identity must be verified. OpenID Connect (OIDC) solves this authentication problem.
When logging into Megaladata, the user enters their data, and the authentication server (e.g. Keycloak or Okta) verifies them. If authentication is successful, Megaladata receives an ID Token to confirm who exactly has logged in. This token contains the user's identification information and allows Megaladata to correctly determine which user is interacting with it.
OAuth 2.0: Authorization without sending passwords
The OAuth 2.0 standard is responsible for authorization, allowing applications to gain limited access to other systems without transmitting passwords. For example, if Megaladata requests access to data, the authorization server issues an access token confirming that the user has the right to this access.
Using OIDC and OAuth 2.0 together allows you to separate the authentication and authorization processes, ensuring secure login to Megaladata.
Advantages for Megaladata
- Megaladata does not store passwords, but receives data securely through standard APIs.
- Centralized account management is transferred to the authentication server (identity provider).
- Rights and access permissions are determined by corporate role models.
- Single sign-on (SSO) allows you to automatically sign in to multiple applications with one account.
Account management add-ons such as updating user information, periodic password changes, issuing temporary passwords, and managing account expiration dates are handled by the identity provider and the administrator. This also includes two-factor authentication (2FA), user session control, and login attempt monitoring. Thus, Megaladata does not have to manage these processes, but rather, delegates them to a specialized tool and the identity provider's administrators.
Main elements of OpenID Connect (OIDC)
Before proceeding to configuration, let's first define the main OIDC elements:
| Element | Description |
| User | A person who wants to log in |
| Authentication/authorization server (identity provider) | A system that manages user access to the requested resource. Authentication and authorization processes are often performed via several API calls within one system (for example, Keycloak), but not necessarily. It is possible to employ separate systems for the two processes. |
| Scope | A set of permissions that determine what data will be requested from the authentication server. For example, openid, profile, or folders. |
| Authentication endpoint | The URL to which the user is redirected to log in after clicking "Login with OpenID" in Megaladata. |
| Authorization code | A temporary code that the client application (in this case, Megaladata) can exchange for access tokens. |
| Token endpoint | The URL to which the client application sends the authorization code to obtain an access token. |
| ID token | The result of the OIDC authentication process. It is passed to the application to confirm that the user has been authenticated. The ID token comes with the access token in exchange to the authorization code. |
| Access token | A token that confirms the client's access rights and contains information about the user. Most often, this is a JWT token—a web token in JSON format encoded in base64. |
| Claim | The information stored in the access token is a *claim name/claim value* pair that contains specific information about the user (e.g., name, folders, or roles). |
| UserInfo Endpoint | An API through which the application can obtain additional data about the user. This is especially useful for a new user the system doesn't yet recognize. |
| Authorization flow | The model of interaction between the user, the client application (Megaladata), and the authorization server (e.g., Keycloak). |
Authentication and authorization flow when using OIDC in Megaladata

Authentication and authorization process diagram
The image illustrates the following processes:
- The user opens the Megaladata start page and selects Login with OpenID.
- The user is redirected to the authorization server (to the login/password entry form).
- The user enters their login and password.
- If successful, the authorization server redirects the user to the Megaladata page, sending out the authorization code.
- The Megaladata server contacts the authorization server to exchange the authorization code for an access token.
- The authorization server provides an ID token and an access token.
- Using the access token, Megaladata requests additional user data from the authorization server.
- The authorization server returns the requested additional user data.
- Based on the access token and the additional data, Megaladata authenticates and authorizes the user, granting them access.
Setting up OpenID authentication for Megaladata via Keycloak
Why Keycloak?
Keycloak is a powerful authentication server that supports OpenID Connect, OAuth 2.0, and SAML. It is free, actively developed, has a user-friendly web interface, and is well suited for enterprise solutions.
Main reasons for choosing Keycloak for integration:
- Open-source and free: No licensing restrictions.
- Flexibility of customization: Supports roles, security policies, and single sign-on (SSO).
- Simple integration: Easily integrates with Megaladata and other corporate services.
- Adaptability: Supports various standards.
Keycloak integrates well with LDAP, Active Directory, or Kerberos.
Deployment environment
The OIDC configuration example provided in this article is implemented in the following environment:
Server
- Operating system: Ubuntu
- Hardware resources: 4 cores, 16 GB RAM, and 100 GB disk space
Megaladata
- Edition: Enterprise
- Version: 7.2.3 (OIDC support starts from Megaladata 7.2.0)
- Installation: Megaladata Server is already installed and running; no additional packages or dependencies are required
Authentication server (identity provider)
- Software: Keycloak (version 20.0 but this is not a mandatory requirement)
- Installation: Keycloak is already installed and running; no additional extensions are required
How to install Keycloak?
See the official documentation: Keycloak — Getting Started.
Important consideration
The Linux version of Megaladata is not mandatory: OpenID Connect login is supported on all operating systems where Megaladata works.
Configuring Keycloak
First, let's configure Keycloak to work with Megaladata. To do so, log in to the Keycloak admin panel using administrator credentials.
Creating a new realm
A realm in Keycloak is an isolated authentication space that stores users, roles, security policies, and authentication settings.
It allows you to:
- separate users (e.g., clients and employees can have different realms)
- configure individual authentication rules
- manage different applications in the same Keycloak
Each realm operates independently, allowing centralized management of access across multiple systems.
Let's create a new realm (isolated space) for Megaladata.
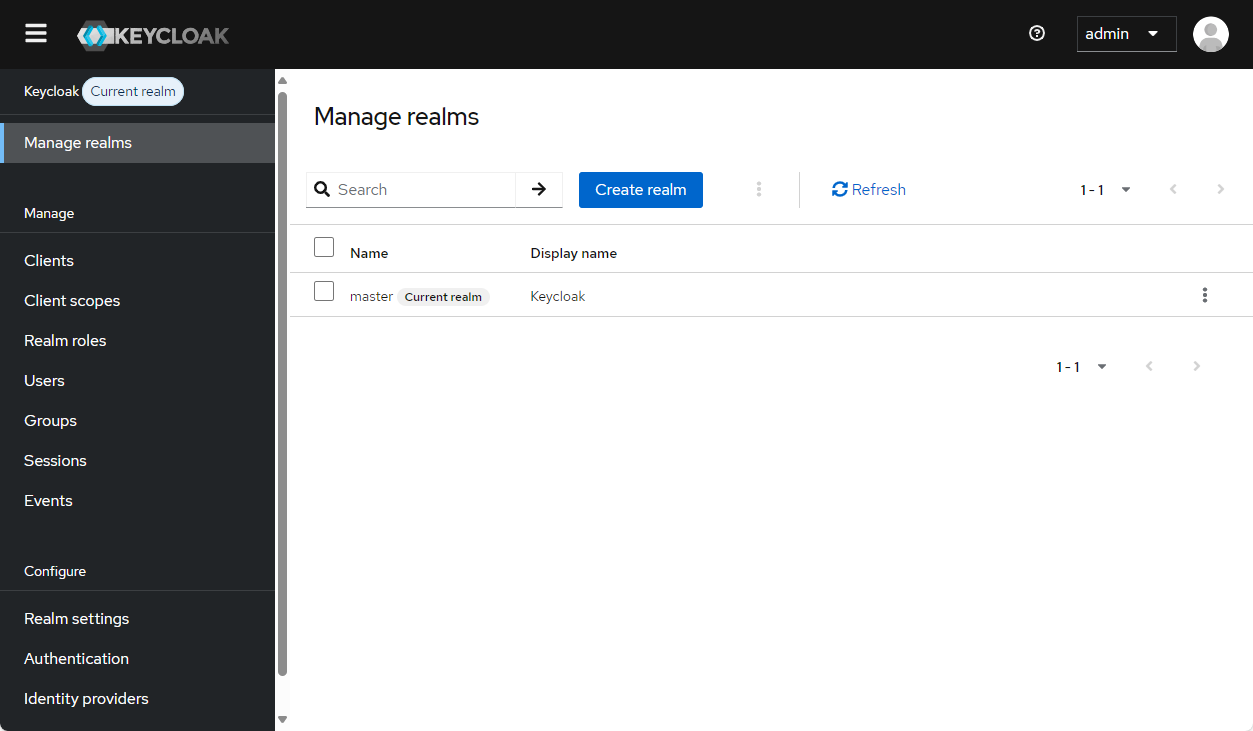
Creating a realm in Keycloak
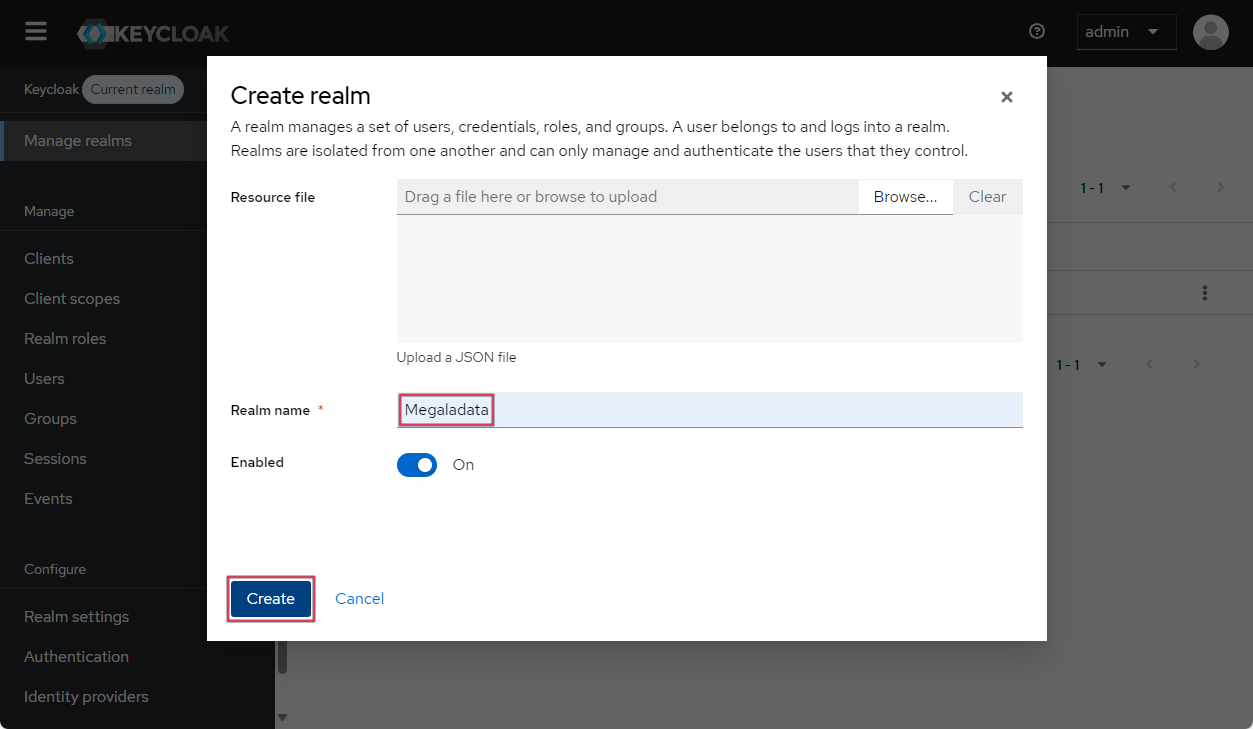
Naming and saving a realm
- Click the Create Realm button:
- Specify the name of the new realm (for example, Megaladata) and click the Create button:
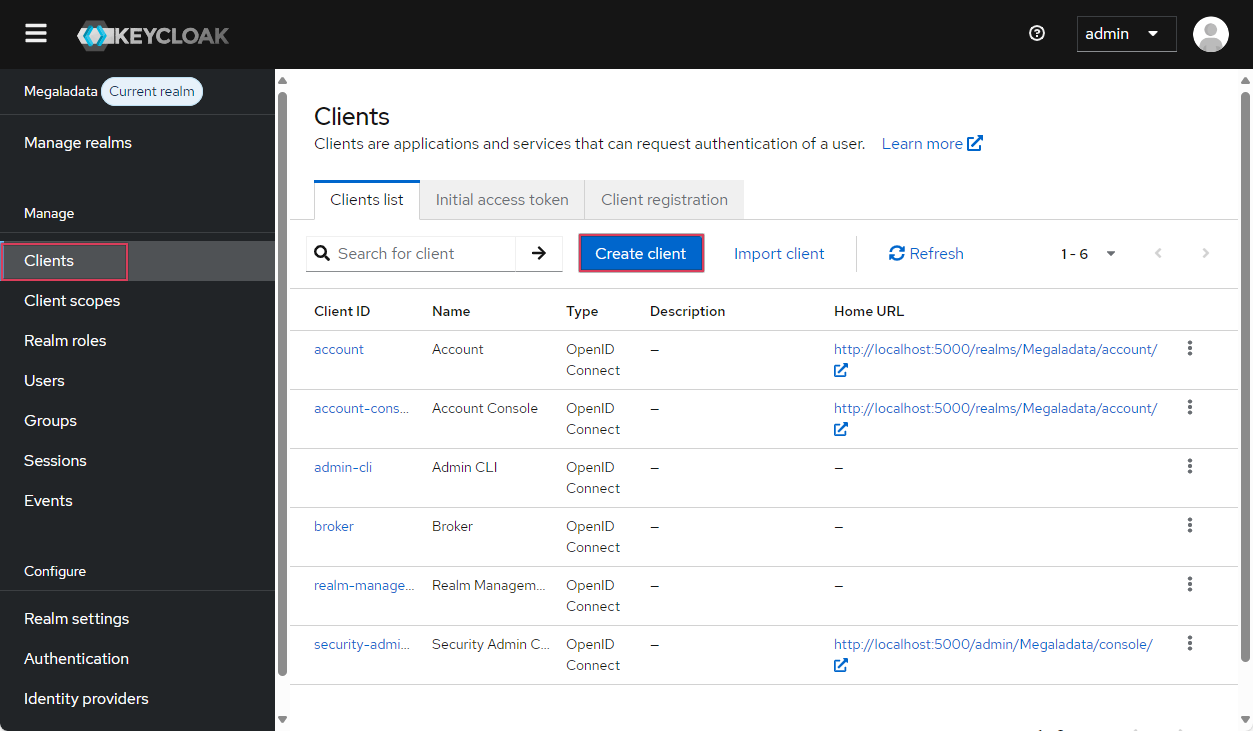
Creating and configuring a client
Next, we will create a new client for our realm.
A Keycloak client is an application or service that uses Keycloak to authenticate and authorize users.
It allows you to:
- configure login methods (OpenID Connect, SAML)
- define access levels and permissions
- flexibly manage sessions and tokens
Each application integrated with Keycloak (including Megaladata) is registered as a client and receives individual security settings.
To create a client:
Creating a new Keycloak client

Selecting the OIDC client type
Configuring the OIDC client
After clicking Next, a new client for working with Megaladata will appear.
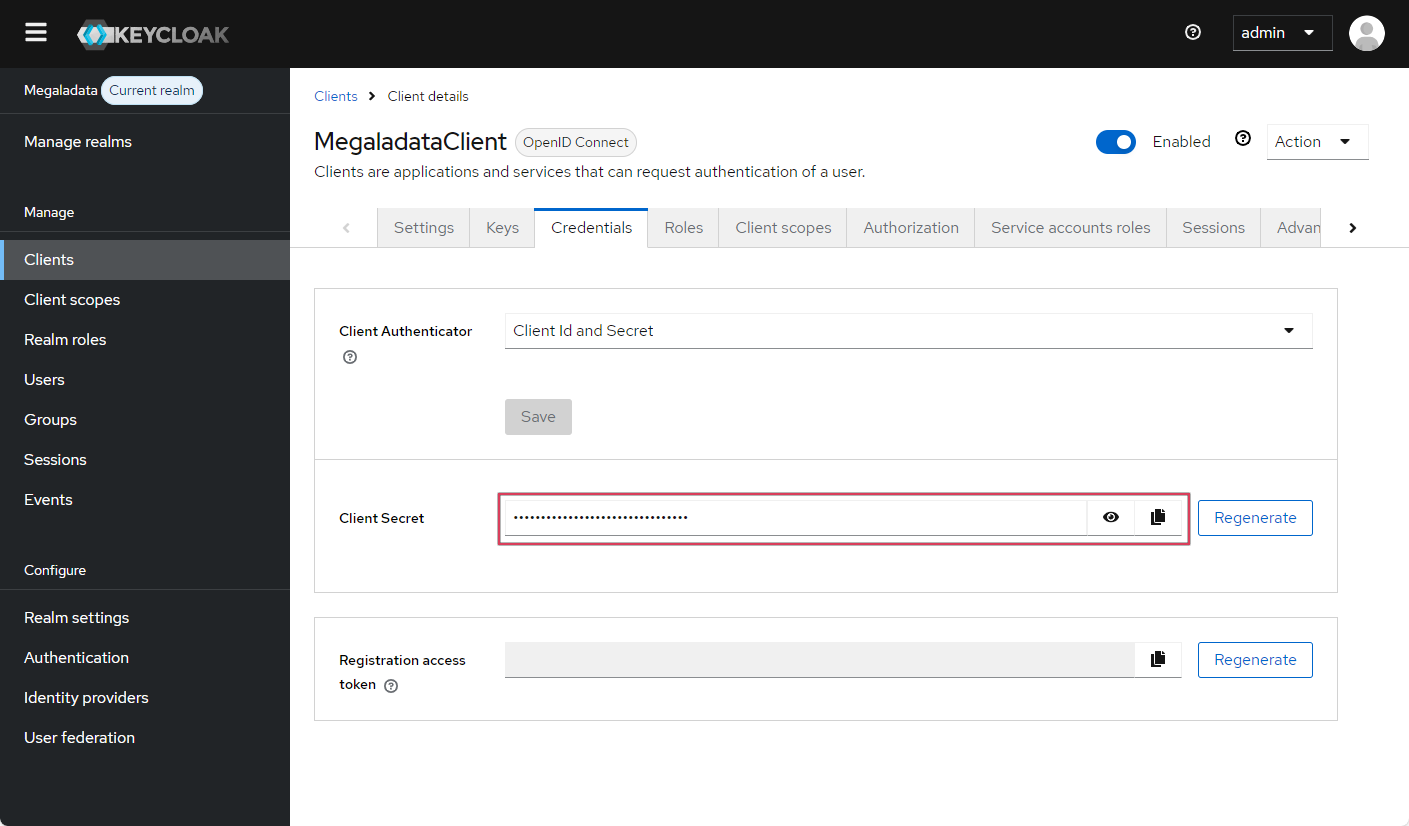
The Credentials tab in Keycloak
Customizing the login page
- Go to the Clients tab and click the Create client button:
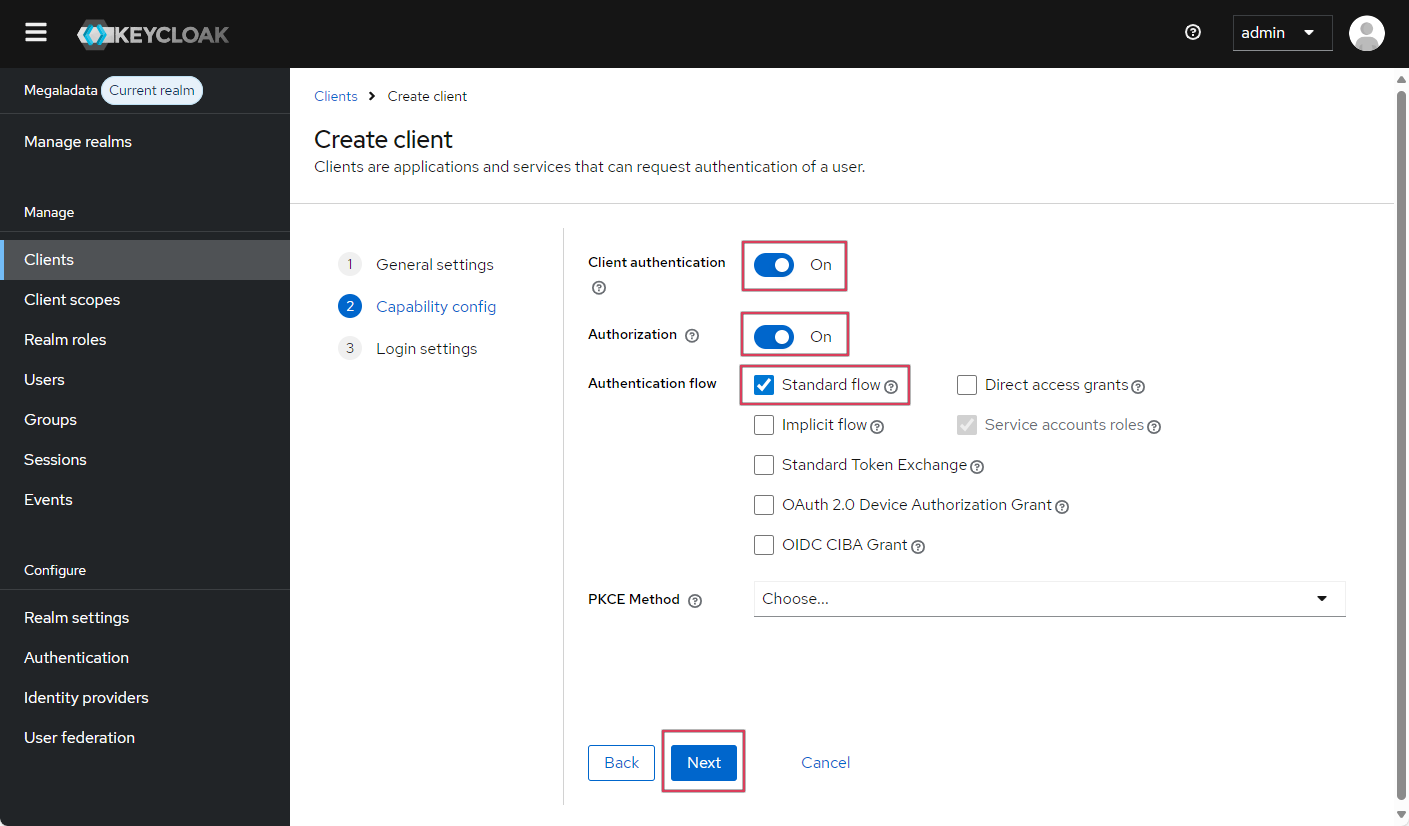
- Specify the client's name (for example, “MegaladataClient”), select the OpenID Connect client type, and click Next:
- Using the slider, enable client authentication and authorization. Select the Standard Flow checkbox and disable Direct access grants (it will not be used with Megaladata). Following the Oauth 2.0 standard, this is Authorization Code Grant. It is used for applications that require a high level of security.
- Enabling authentication and authorization in the client settings means that the application must provide
client_idandclient_secretwhen accessing Keycloak. (In addition to the user, Megaladata Server must undergo authentication and authorization.) Although this is not a mandatory requirement, we recommend using it as an additional security measure. After enabling authentication and authorization, you can find theclient_secretdata in the client information on the Credentials tab: - You must also specify Valid redirect URIs in the Access Settings section. These are the URLs where Keycloak is allowed to redirect users after successful authentication. This setting prevents tapping by intermitting the connection. Enter the Megaladata start page as the permitted URL:
{Megaladata_host_name}/app/.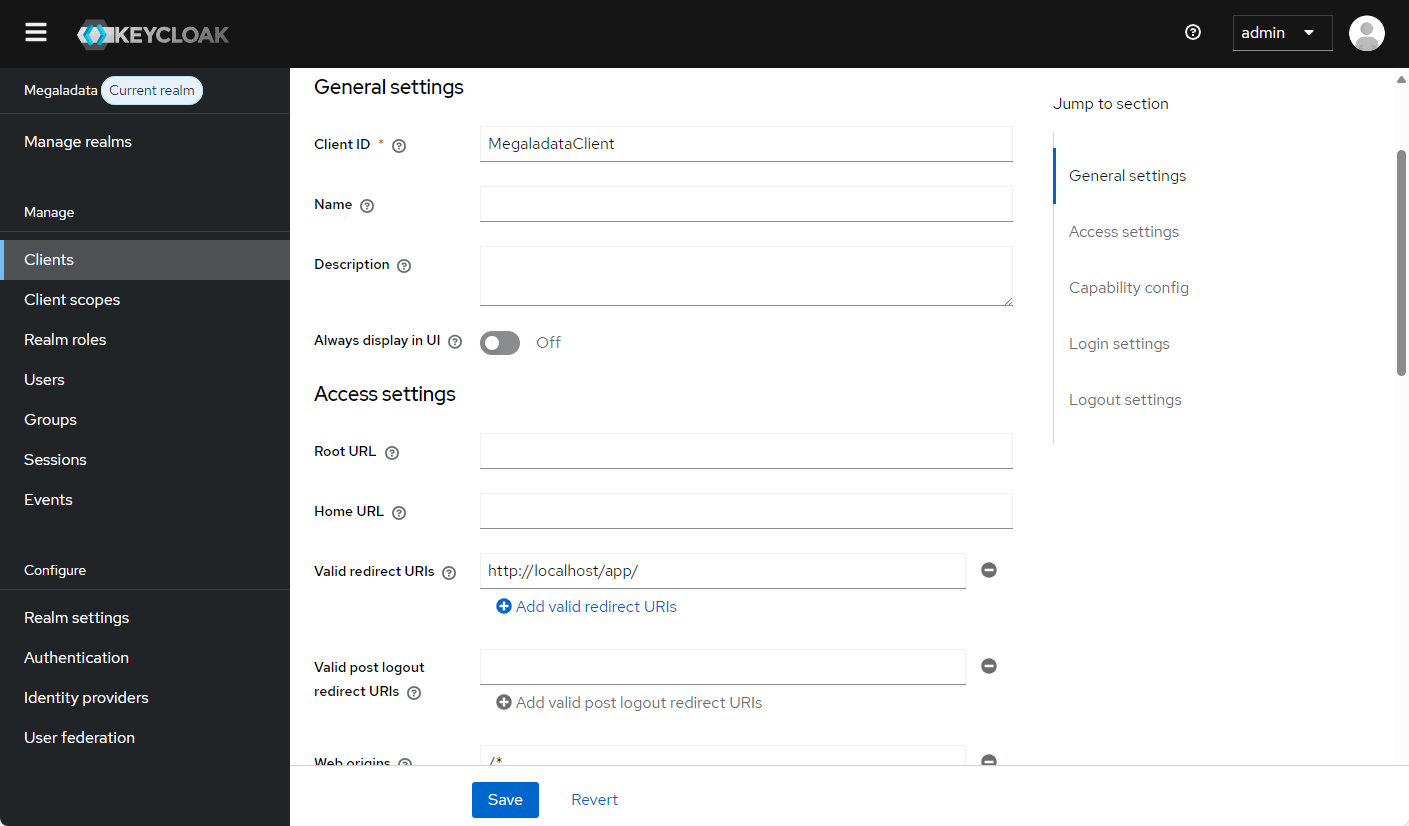
Setting the redirect URL
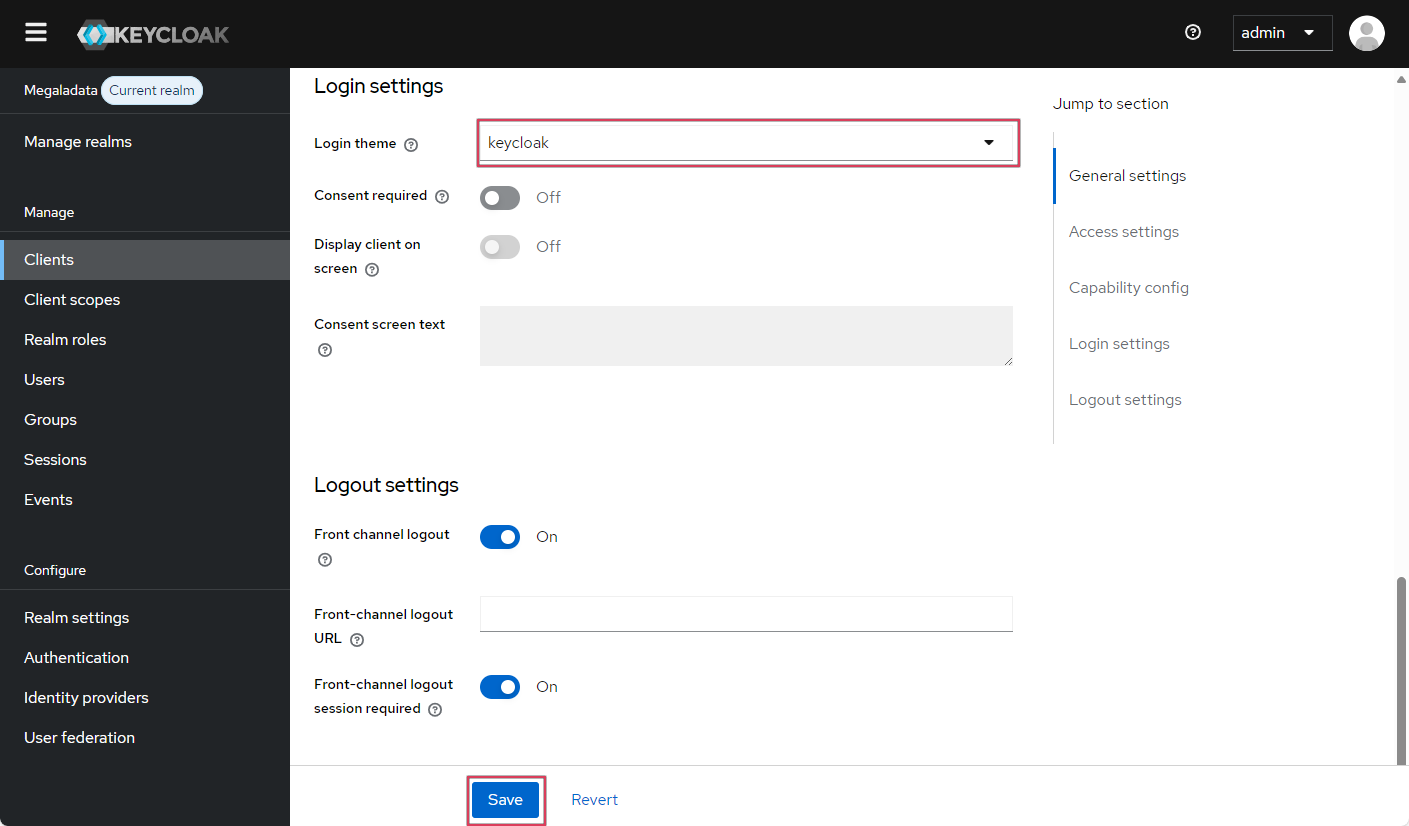
- Next, you can select a login theme for the Megaladata login with Keycloak in the Login settings section. Scroll down two or three screens in the client settings. Click Save:
This minimal set of client settings is enough for integrating Keycloak with Megaladata. If necessary, you can set additional settings, such as the lifetime of different types of tokens and sessions—Access Token Lifespan, Client Session Idle, Client Session Max, etc.:
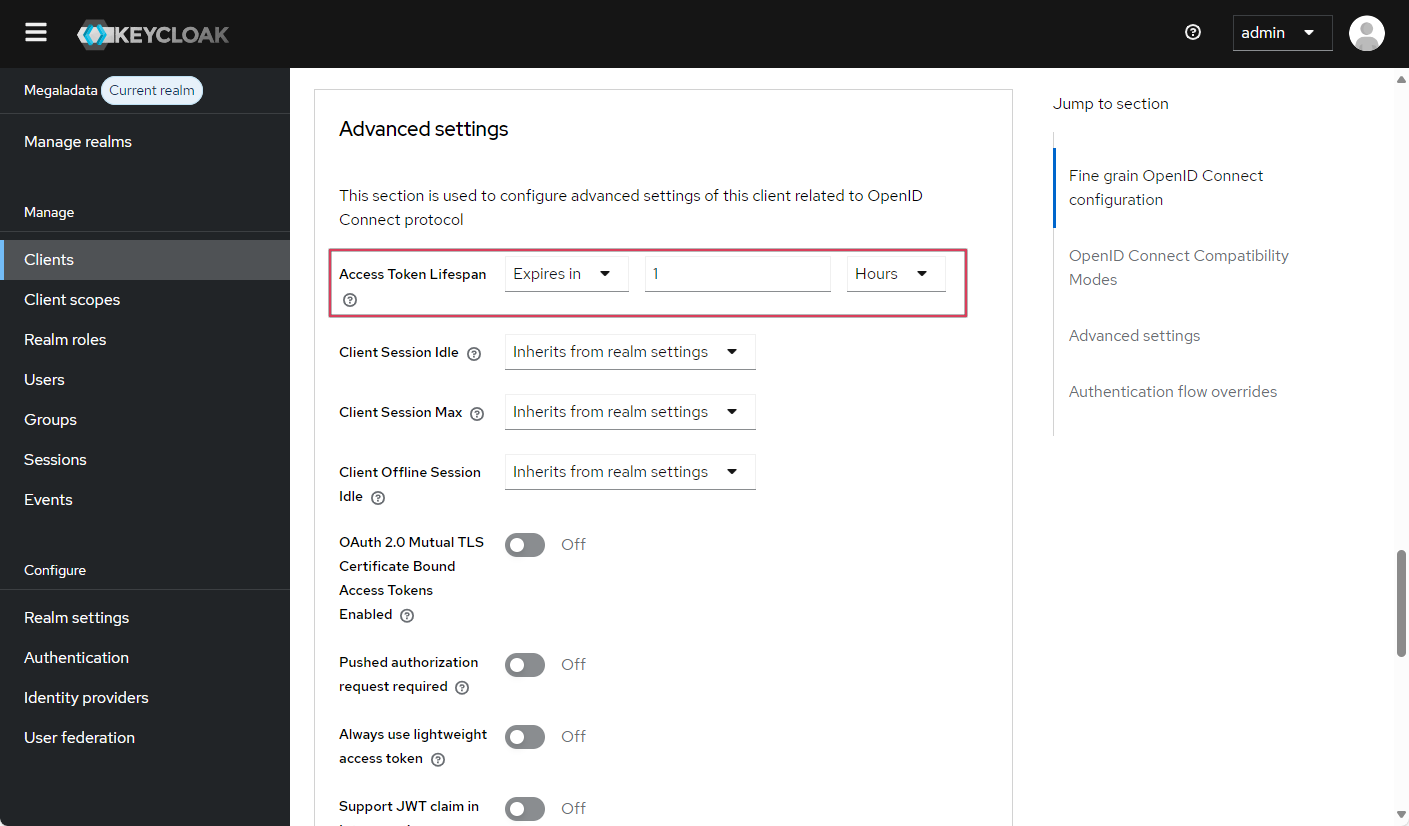
Configuring token lifetime
Creating role models
Let's define Keycloak role models corresponding to the models in Megaladata.
| Role in Megaladata (Available Actions) | Keycloak Role |
| Workflow design | Designer |
| Viewing workflows | Viewer |
| Administration | Manager |
| Publishing packages | Publisher |
| Full access to the file storage | Full access to the file storage |
| Access to all scheduler jobs | Access to all tasks in the scheduler |
To create a role model in Keycloak:
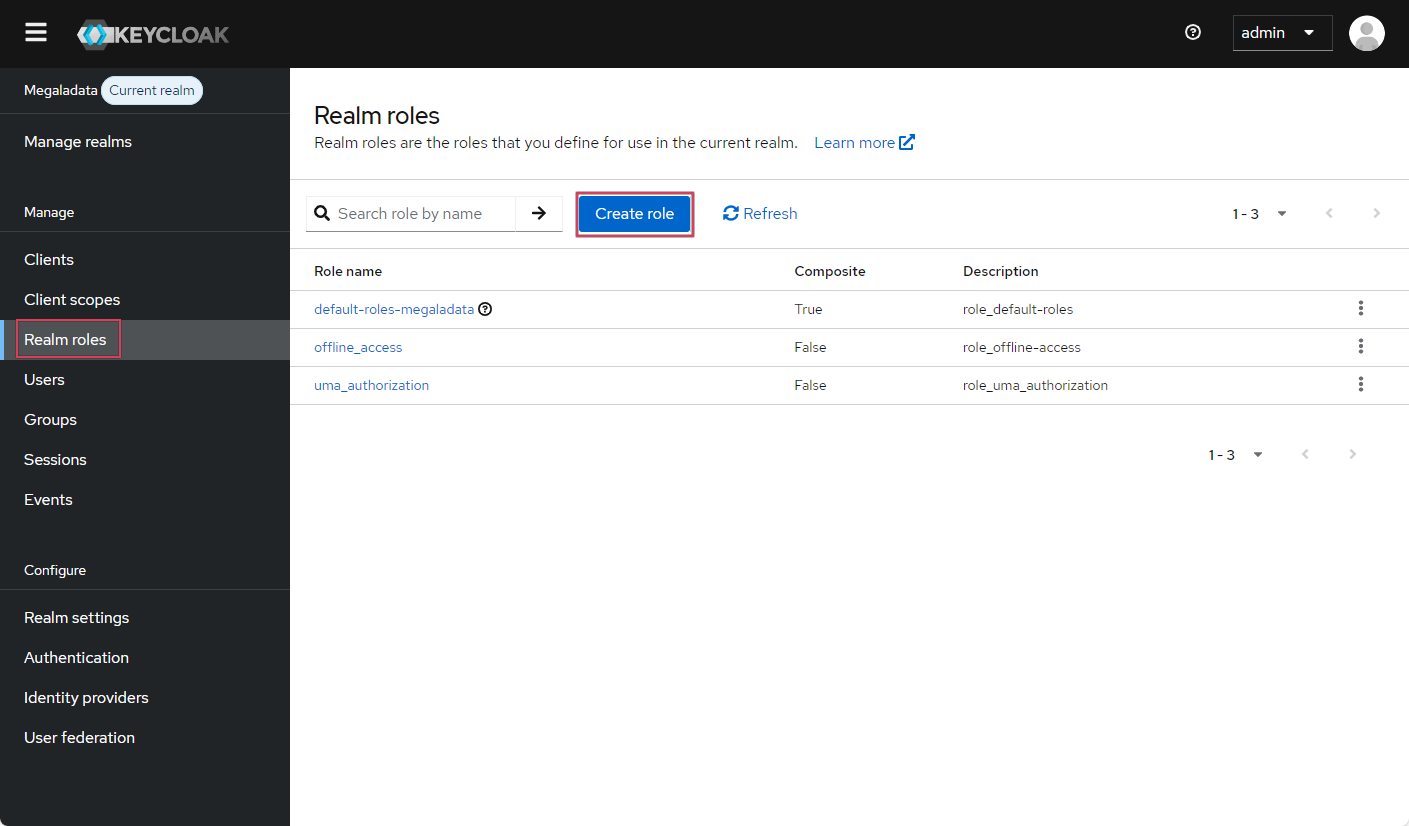
Creating a Keycloak role model
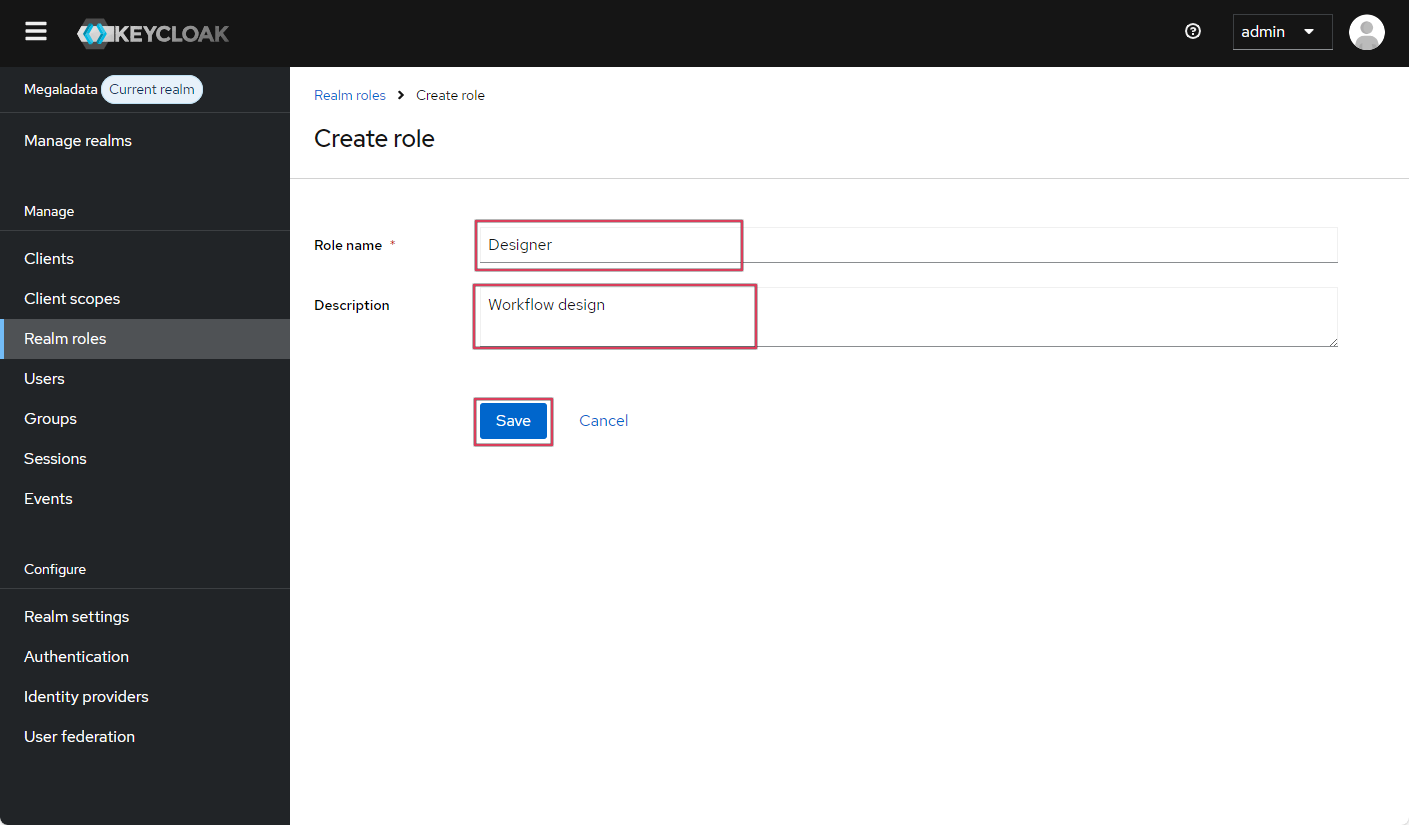
Creating a Keycloak role

A list of Keycloak roles
- Go to the Realm roles section and click Create role:
- In the window that opens, enter the role's name and description:
- Repeat for all other roles, each time saving the new role and returning to the Realm roles tab:
Creating users
In this article, we will show how to create a user manually. In a real production environment, we recommend setting up integration with enterprise authentication providers such as LDAP, Active Directory, or Kerberos if such integration is not set up yet.
To create a user:
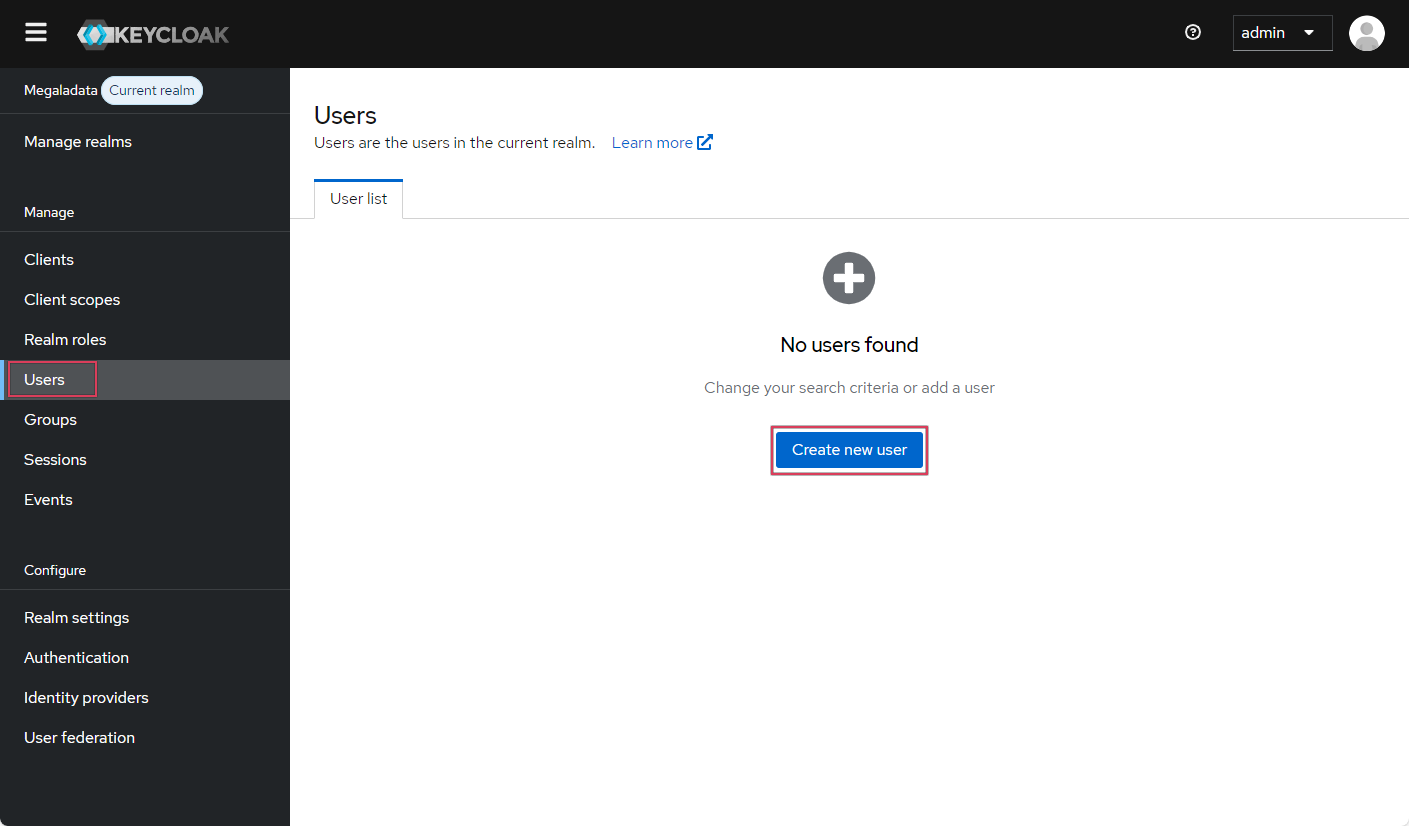
Creating a user in Keycloak
Filling in a user profile
Setting up a user password
Configuring a temporary/permanent password
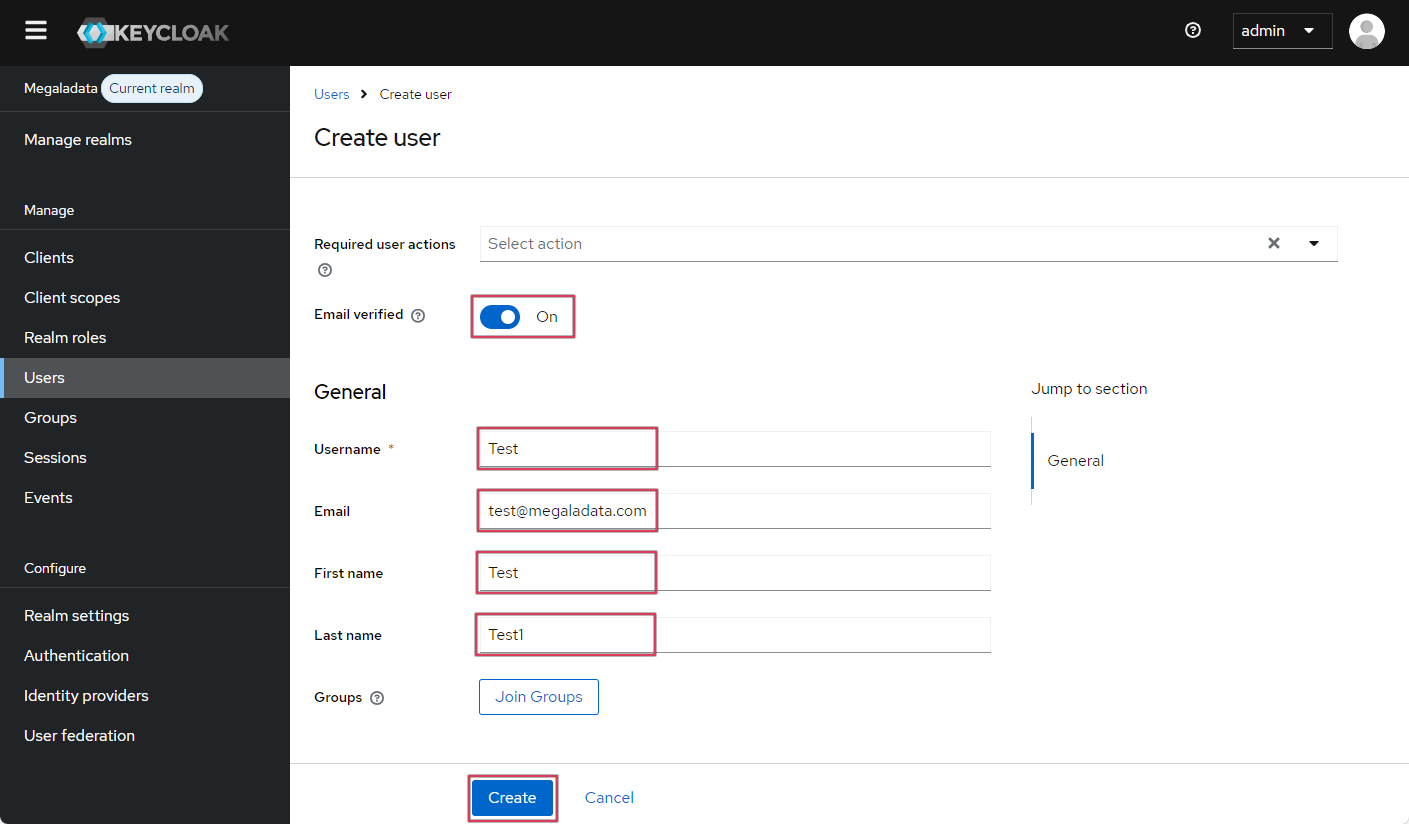
- Go to the Users tab and click Create new user:
- Fill in basic user information:
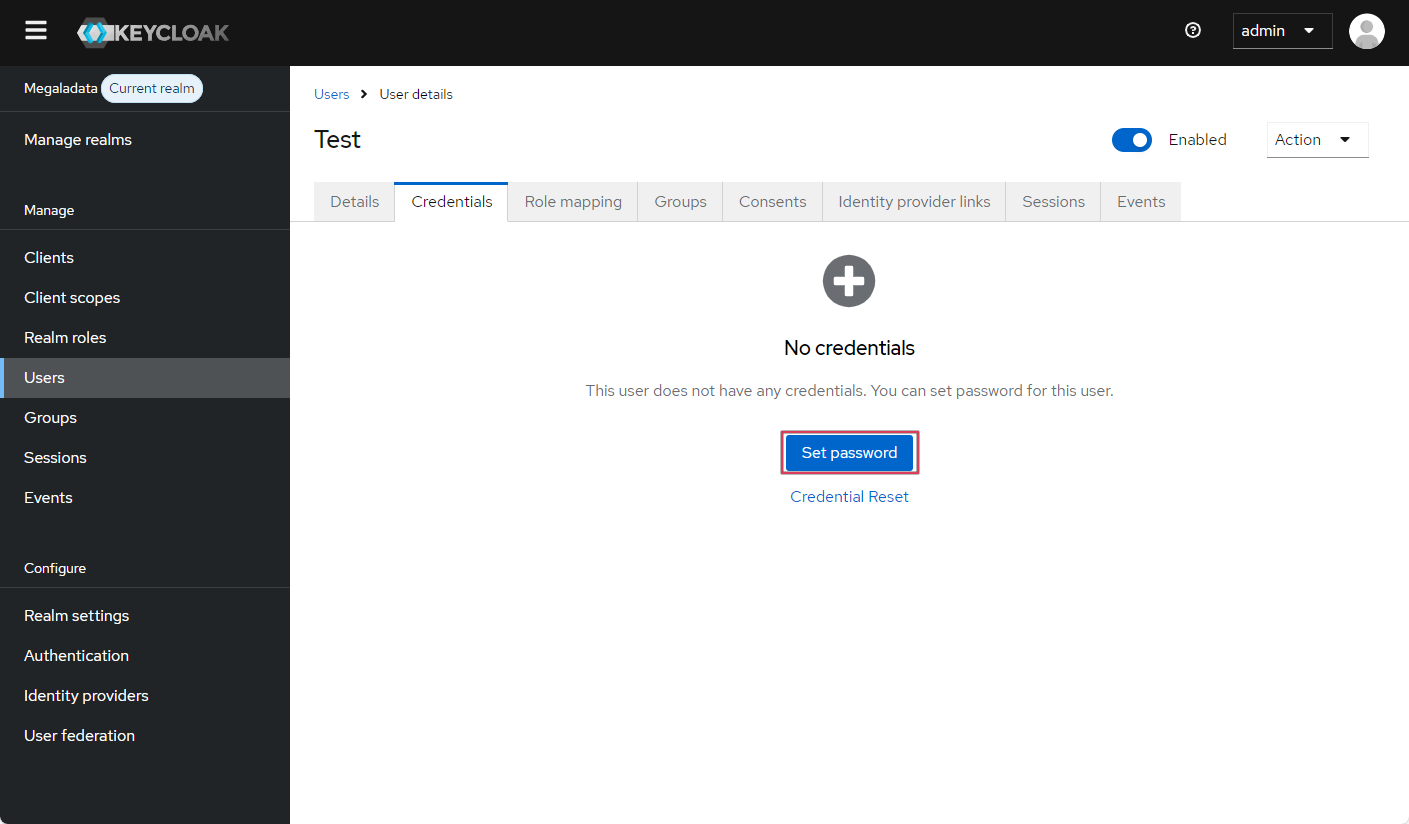
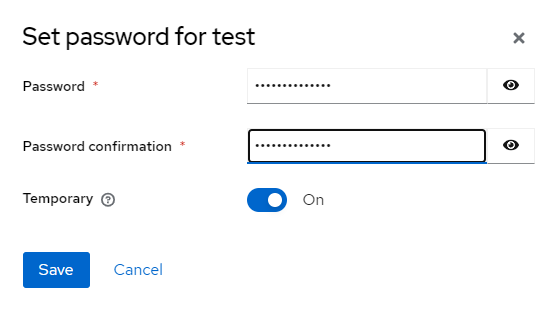
- On the Credentials tab, you can set up a user password, designating it as temporary or permanent. If the password is temporary, the user must change it upon their first authentication operation, setting up their own password:
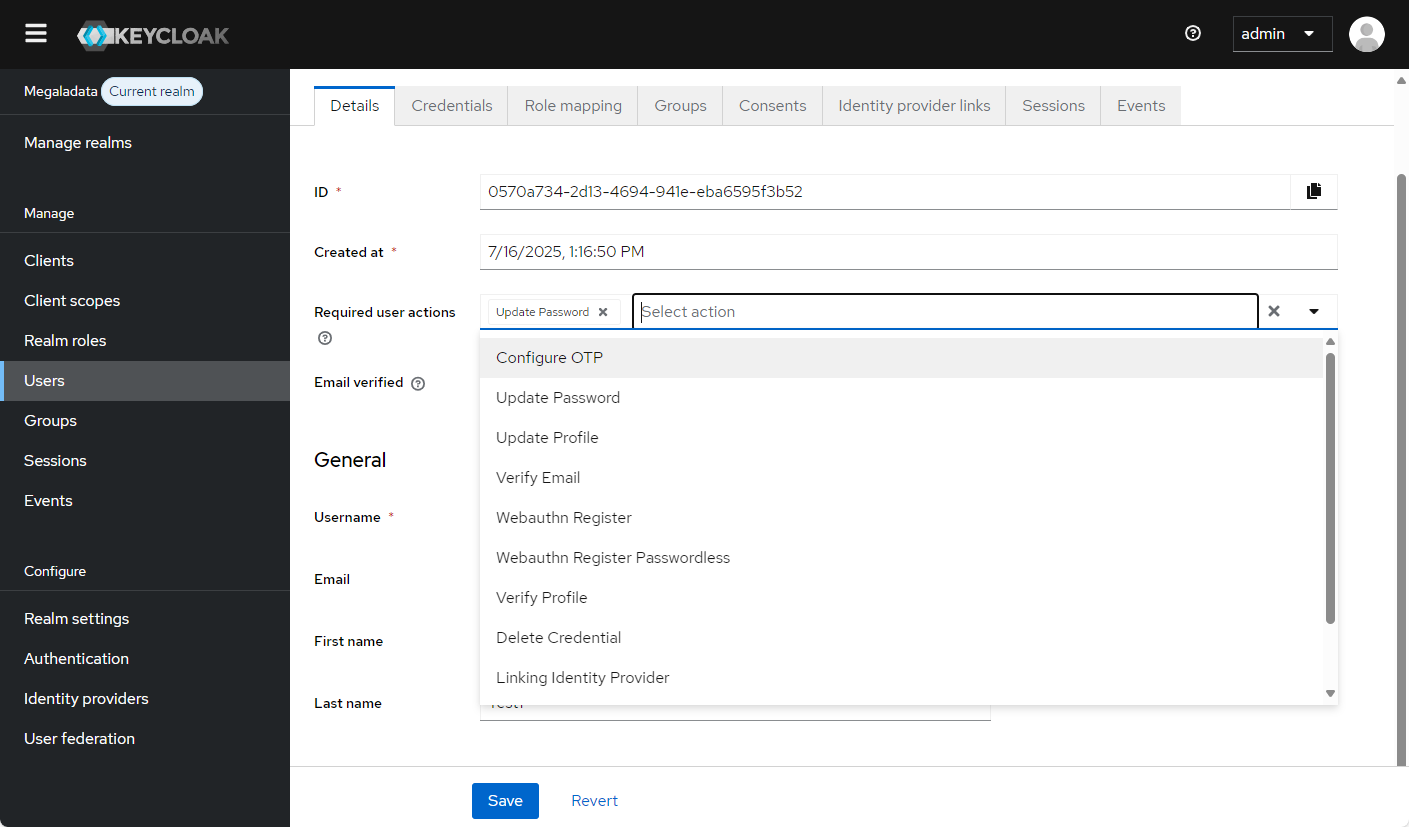
Keycloak provides various account management mechanisms that can be useful in a corporate environment and are worth mentioning in relation with Megaladata login:
- Profile update request: Asks the user to change or add data at the next login.
- Email confirmation: Sends the user a request to confirm their email.
- Sending terms of use before logging in the system: The user will need to accept these terms. (For example, you can summarize the actions allowed or prohibited to the user when working in Megaladata.)
- Enabling two-factor authentication: Adds an extra layer of protection.
- And more, as shown in the image:
User interaction options
Setting additional user parameters
Keycloak allows you to configure additional user parameters that can be useful when integrating with Megaladata.
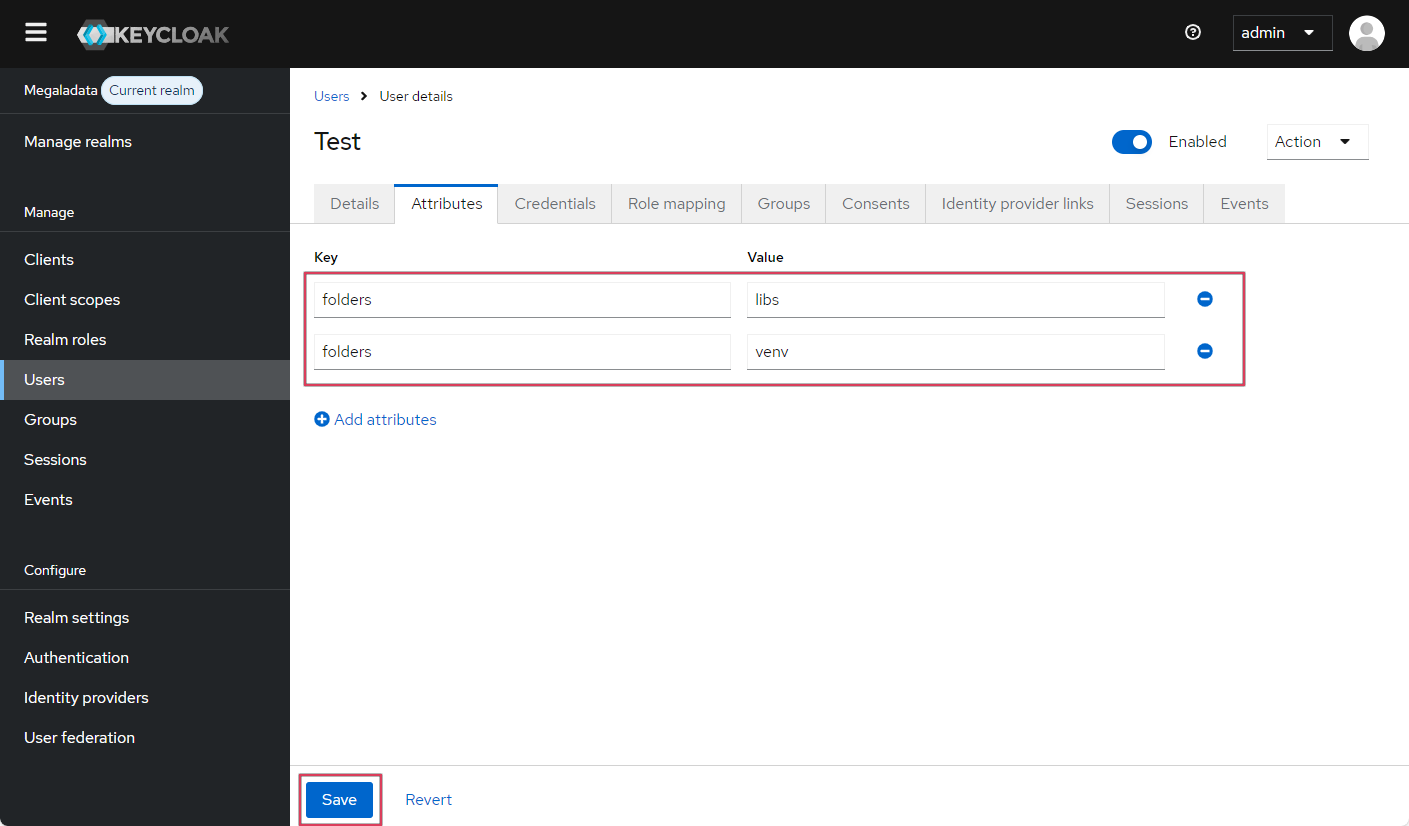
Adding the ability to grant users access to folders
On the Attributes tab, you can add custom attributes. For example, an attribute folders can contain a full list of Megaladata folders the user should have access to:
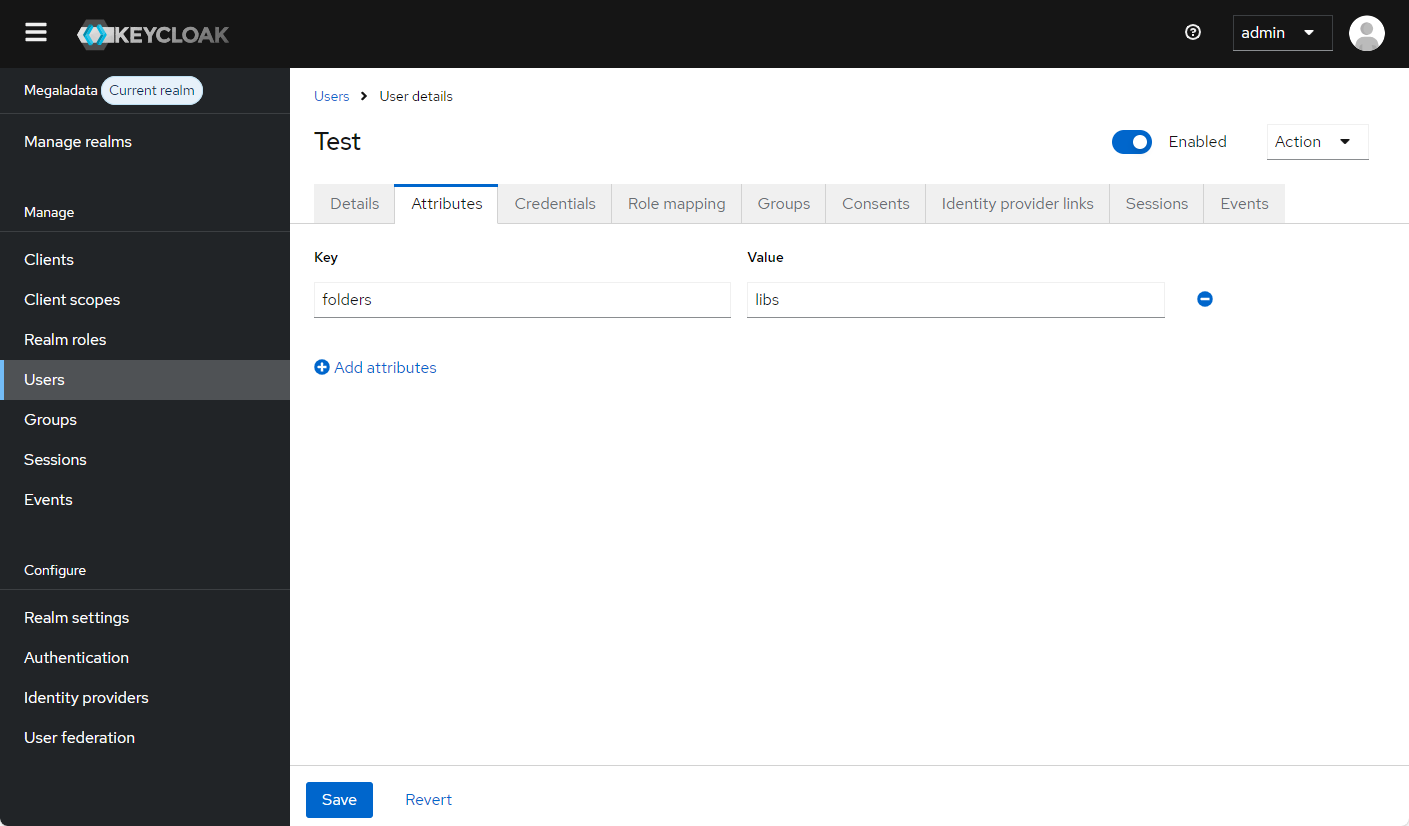
Adding an attribute with folder names in Keycloak
However, simply adding the attribute is not enough. It needs to be included in the token and made available in Scope. To do this, you need to:
Creating a new scope-page 1

Creating a new scope-page 2
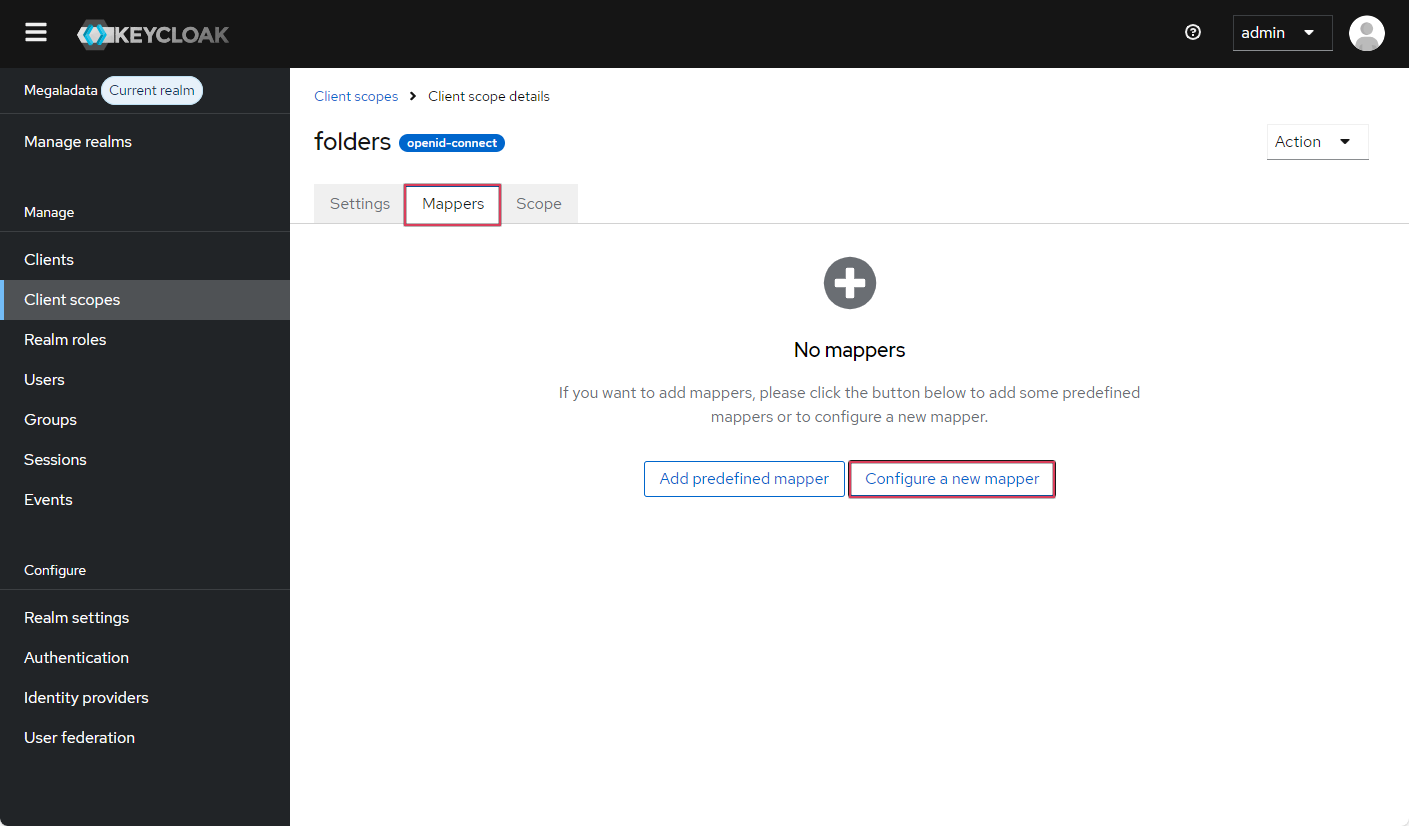
Creating a new mapper
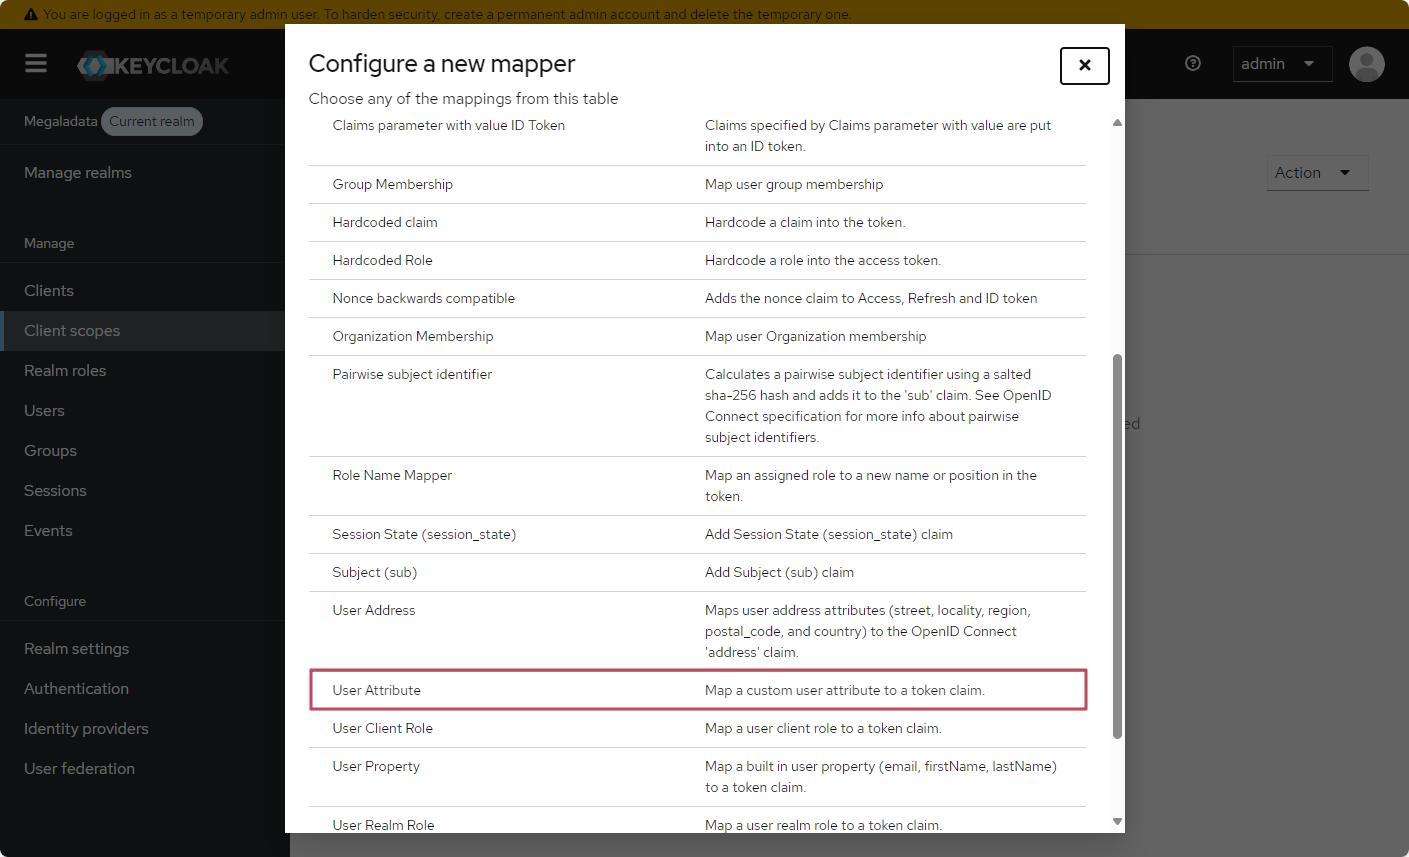
Configuring the new mapper to connect the scope with the User Attribute
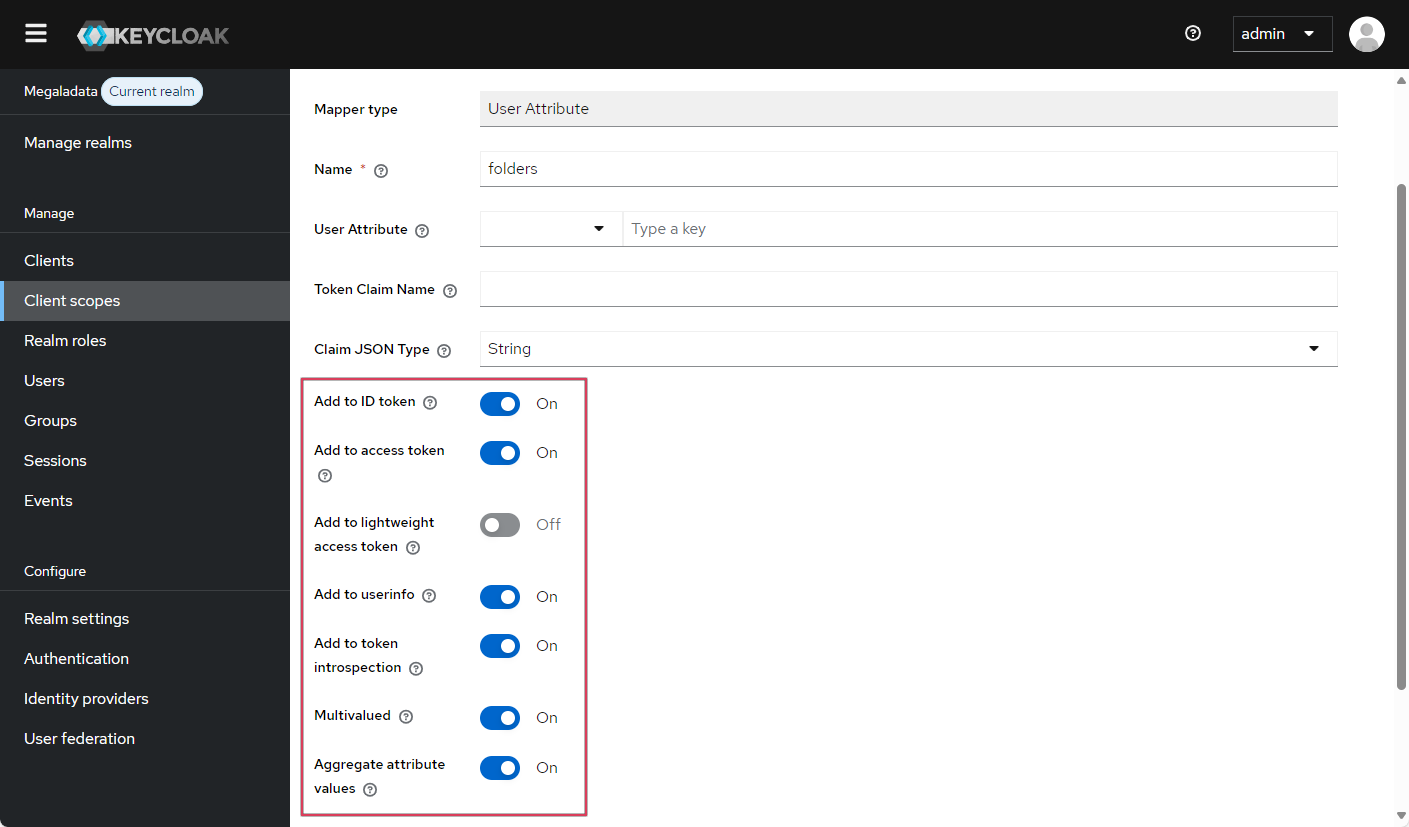
Adding the attribute to all tokens
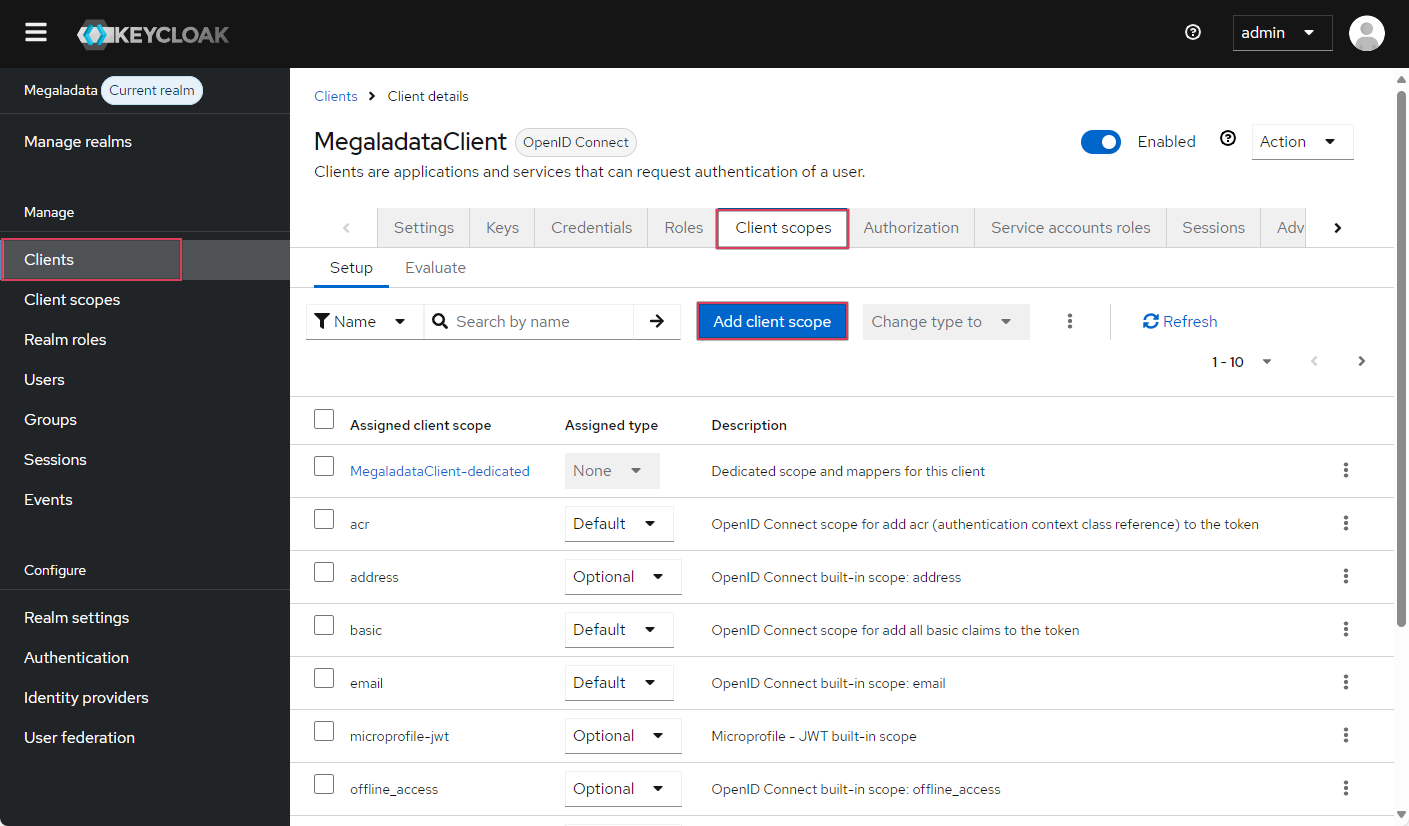
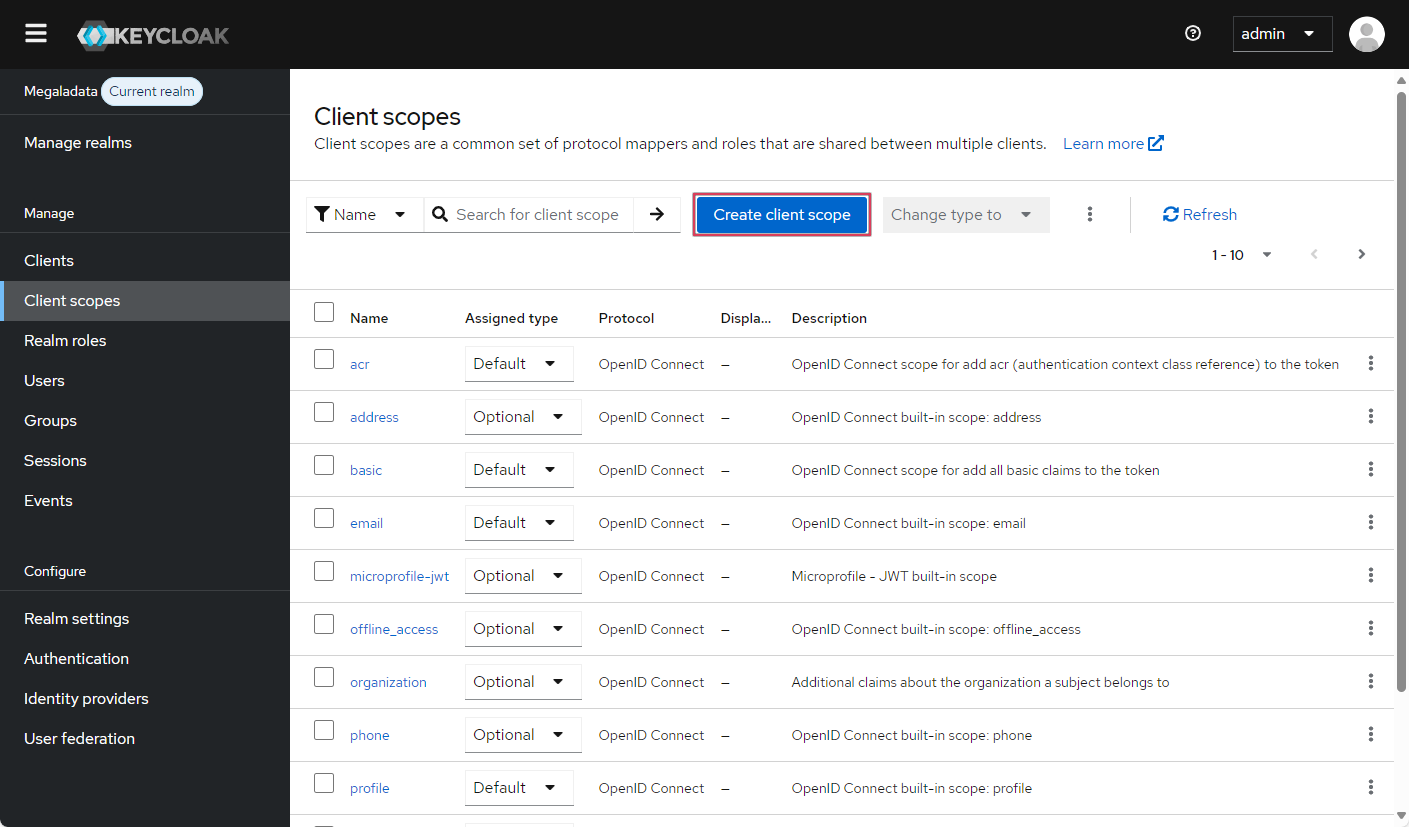
The clients section
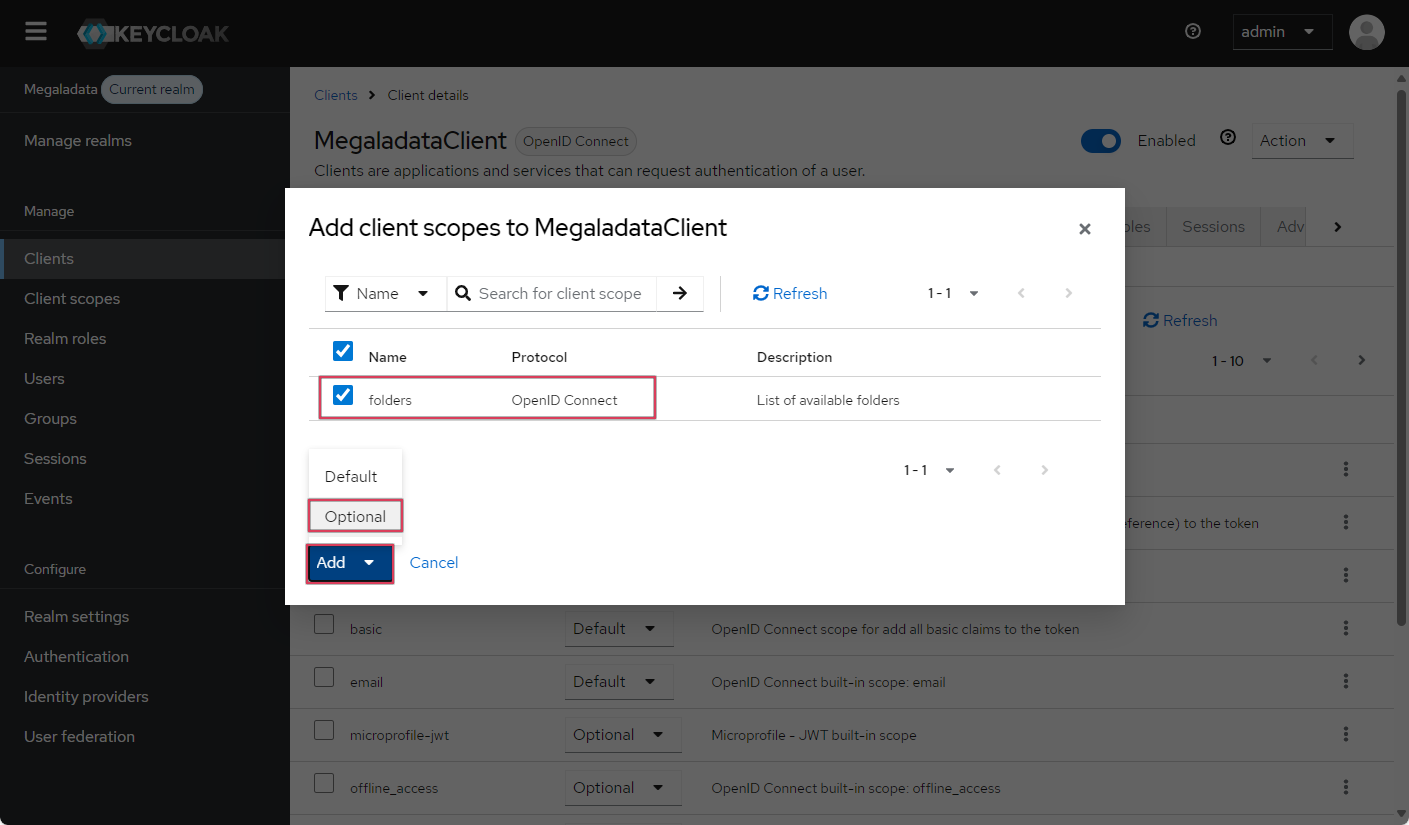
Adding a client scope
- In the Client scopes pane, click the Create client scope button and specify the new scope's name and description, while setting the Default type (its name will be used later when requesting the relevant information through Megaladata):
- Click the Save button. The option to add a mapping rule will appear.
- On the Mappers tab, create a new mapper by clicking on the Configure a new mapper button and selecting the User attribute type—the scope will be associated with the user attribute property.
- Enable all the following options: Add to ID token, Add to access token, Add to userinfo, Multivalued (i.e., can be an array), and Aggregate attribute values (this adds grouping by key).
- Go to the MegaladataClient client details in the Clients section, then go to the Client scopes tab and click on the Add client scope button:
- Select the required scope (in our case,
folders) and configure it as Optional:
Now the folders parameter can be sent to the ID token, access token, and userinfo endpoint, and can be processed in Megaladata.
Assigning user roles
On the Role mapping tab of the Users section, you can assign roles to each user. Click Assign role and select one of the listed roles:
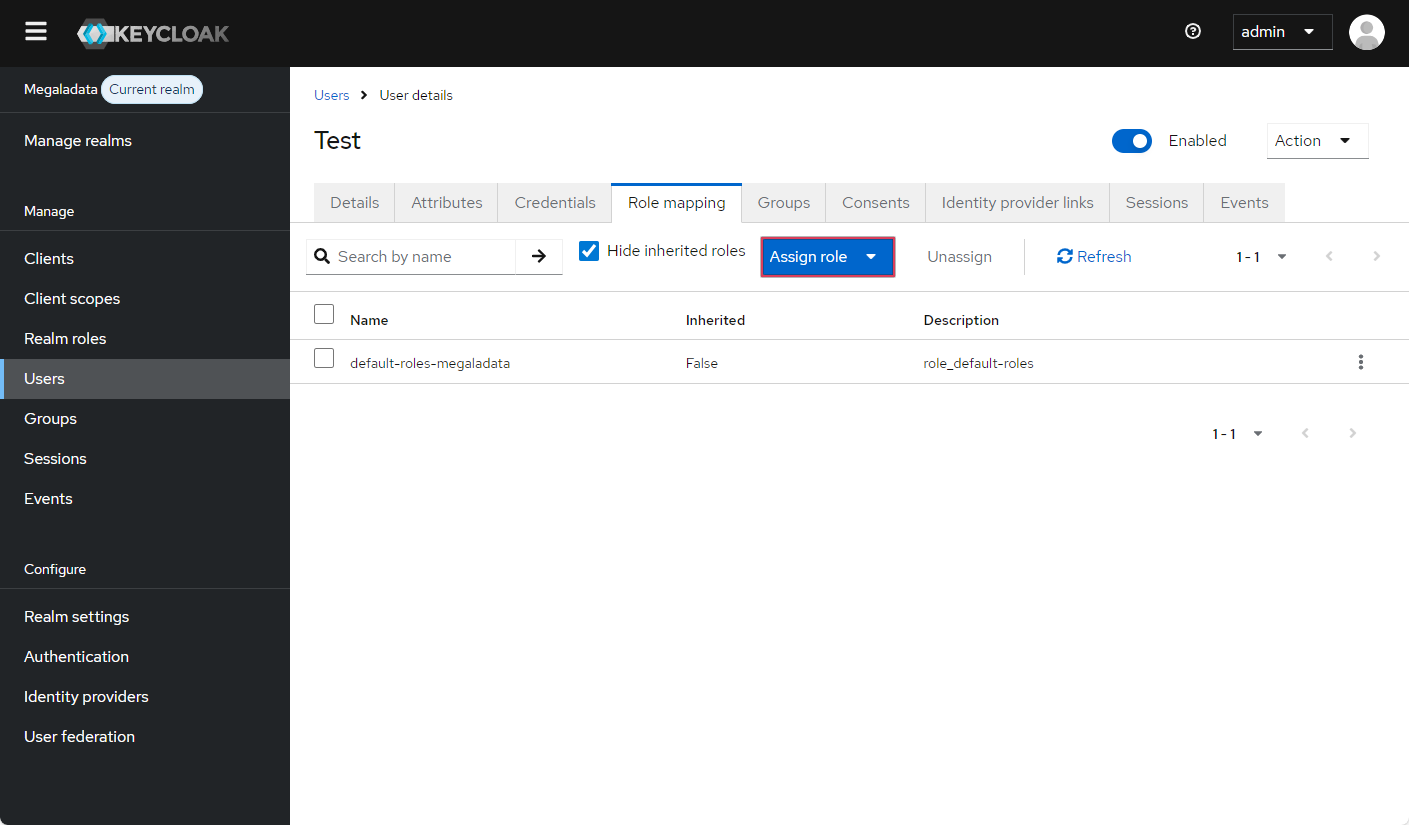
Assigning a user role in Keycloak
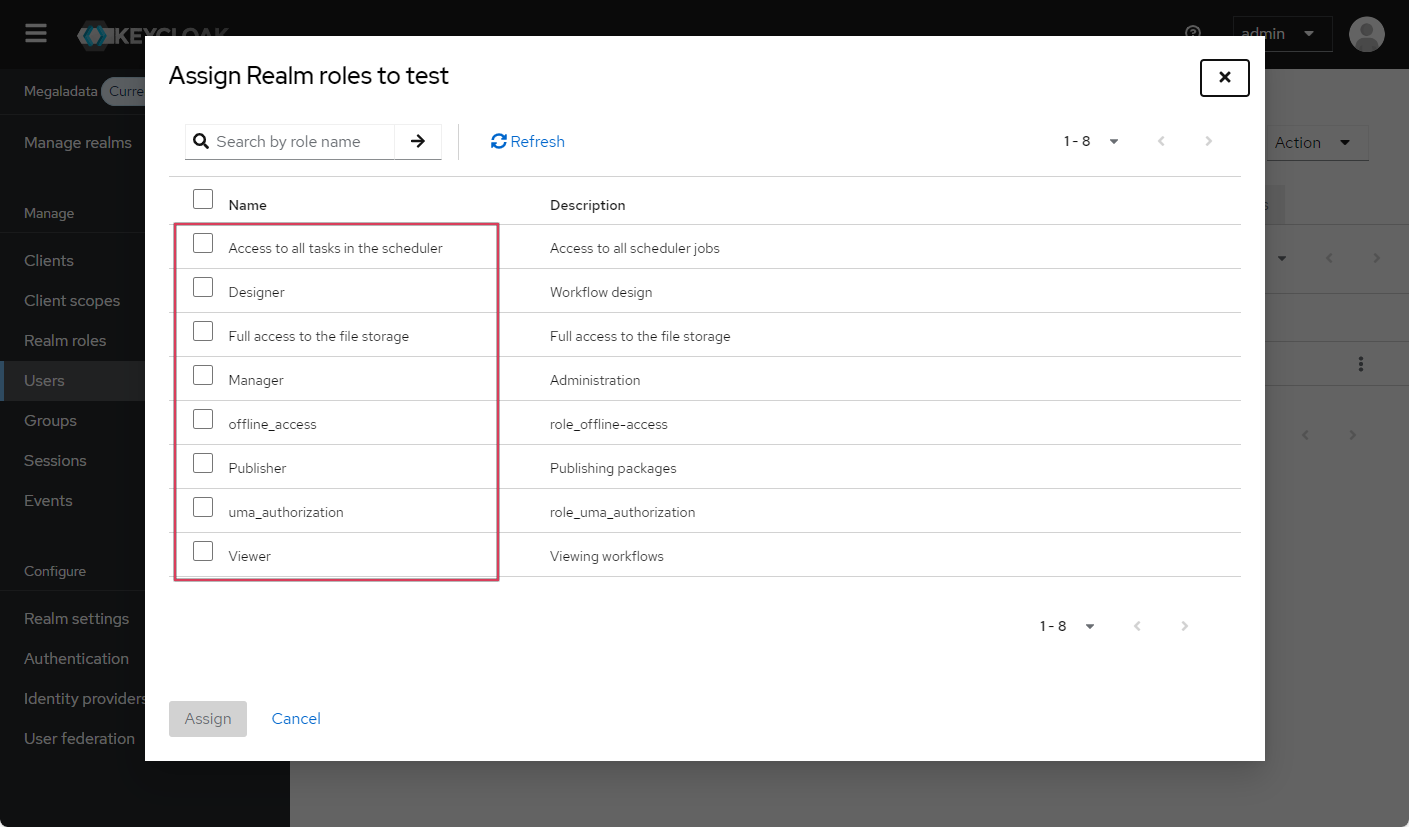
Selecting one of the available user roles
If you need to unassign a role, mark the role's checkbox and click Unassign.
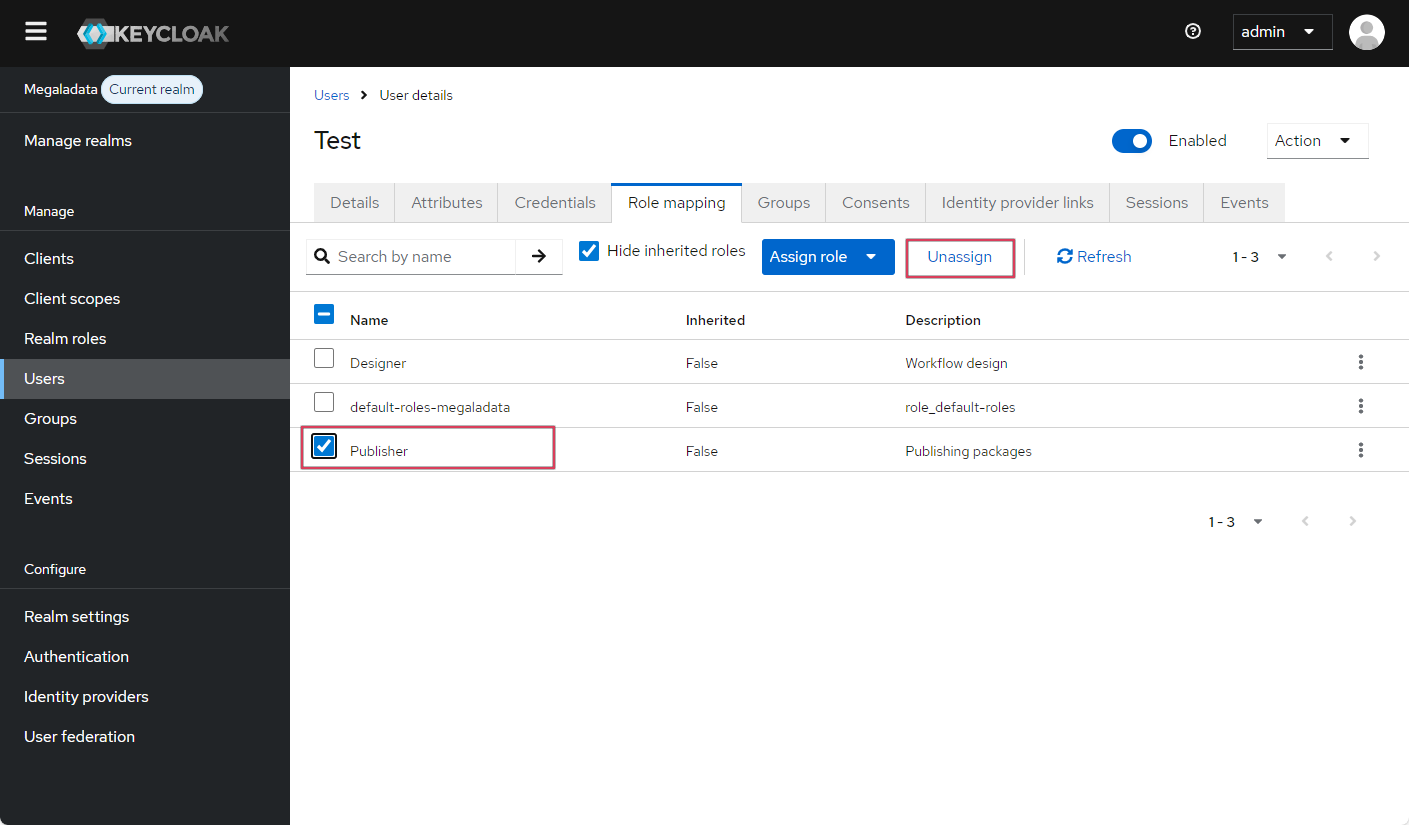
Unassigning a user role
You can simplify the process of assigning roles by setting a default role. For example, you can set the the Viewer role as default for all users, so that all newly added users receive it automatically. To configure a default role, go to the Realm settings section, open the Default roles tab, select the necessary role, and click Assign role:
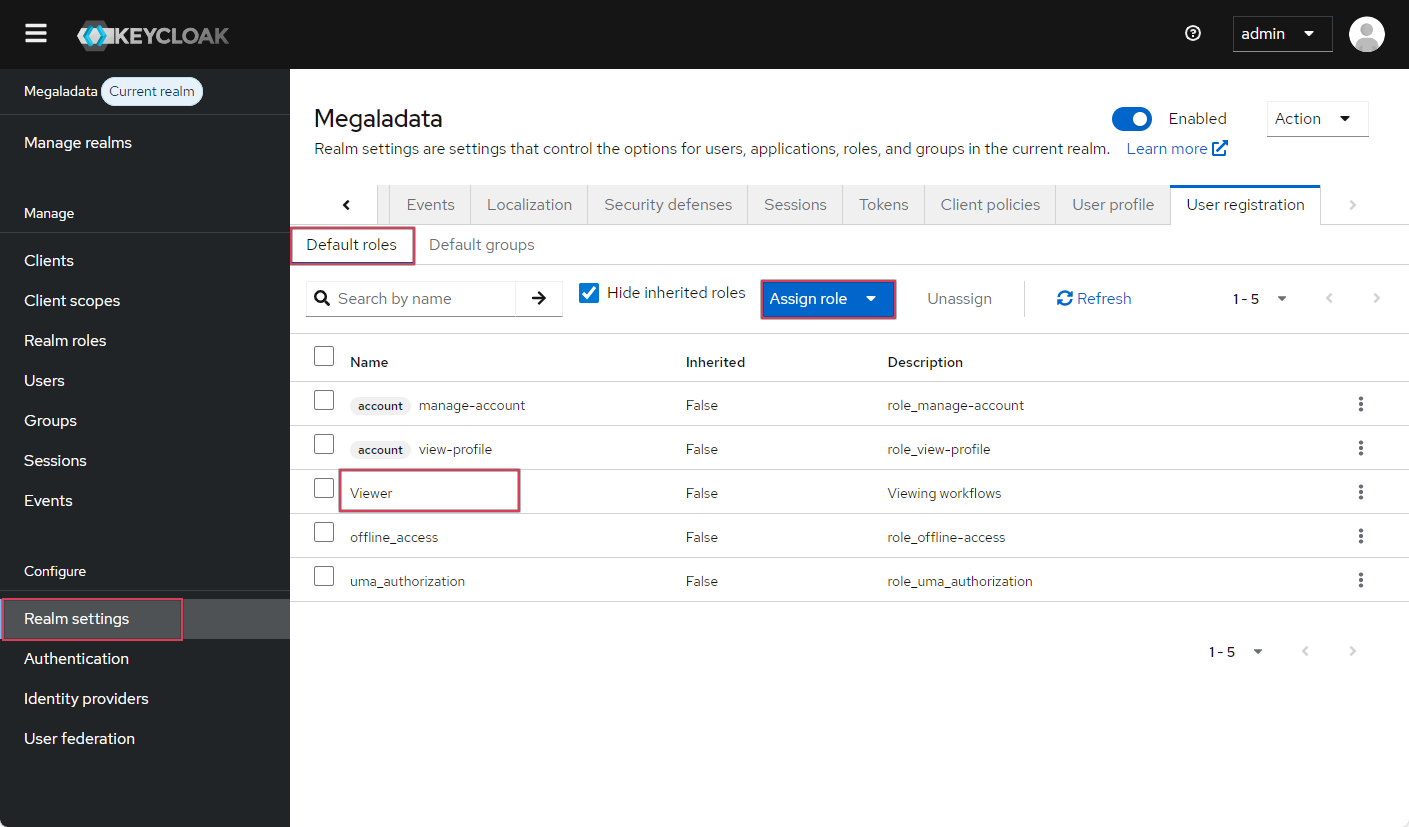
Setting up a default user role
Configuring two-factor authentication
For additional security, you can enable two-factor authentication, which will ask the user to enter a temporary one-time code each time they log in to Megaladata.
This is an optional measure, but if the company's information security requires it, you can employ this functionality.
Keycloak has various built-in tools for implementing two-factor authentication:
- one-time passwords (OTP) via a mobile application (e.g. Google Authenticator, FreeOTP, or Authy)
- WebAuthn (FIDO2): using biometrical login (Face ID, fingerprint) or a USB key (YubiKey, Titan Security Key)
- SMS authentication (OTP over SMS) via a third-party provider (e.g. Twilio, Nexmo, or AWS SNS)
- Email authentication (OTP by email): with a one-time code sent to the user's email
- Push notifications: via Duo Security, Firebase, or Auth0 (login confirmation request)
In this article, we will demonstrate how to set up OTP via a mobile application. To read more about other methods, please refer to the official Keycloak documentation.
The process of configuring OTP via a mobile app looks like this:
Configuring an OTP request via a mobile app
First login QR code
Entering the login and password to sign in to Megaladata
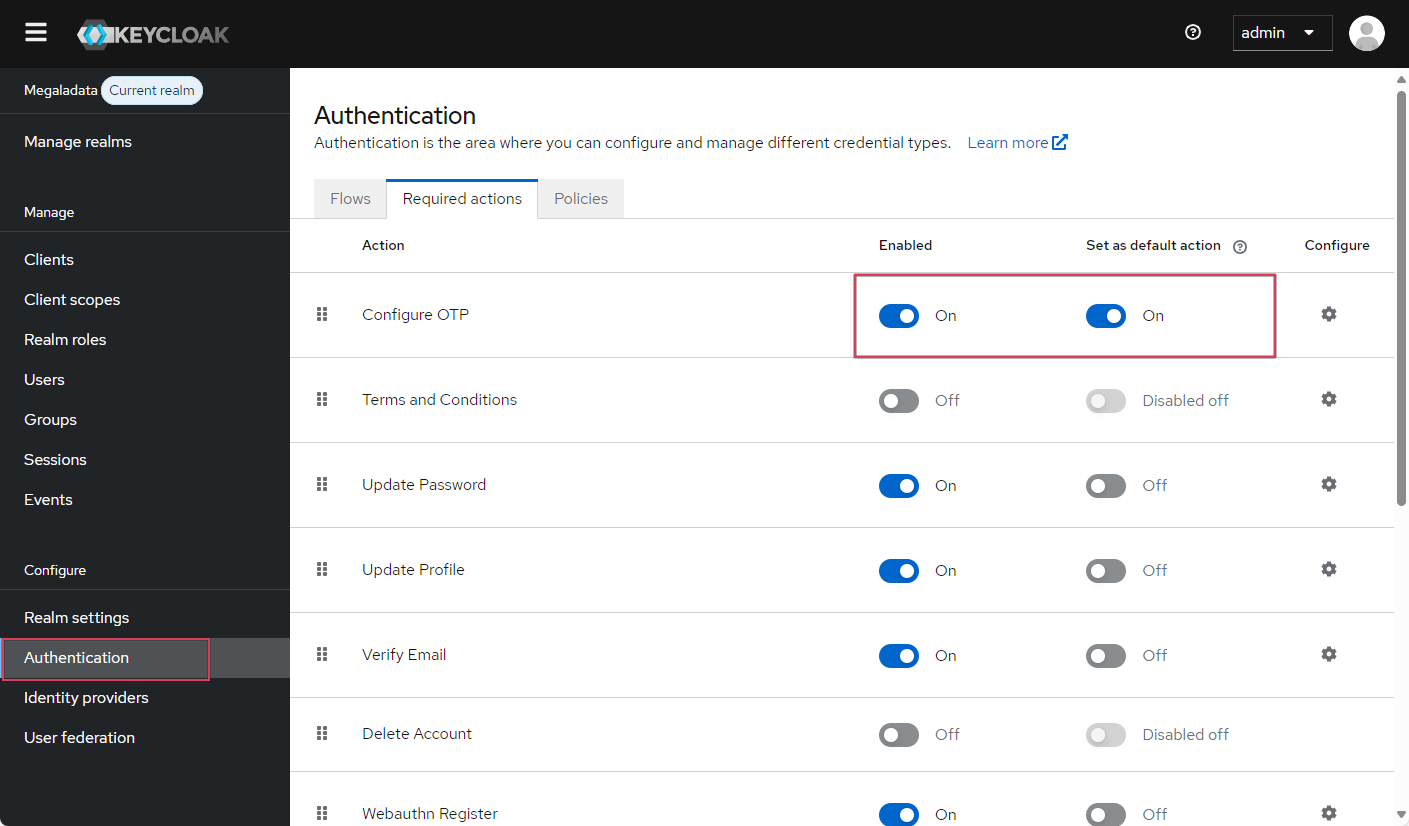
- In the Authentication section, the administrator enables two options in the Configure OTP line: to make the method available and to set it as default for all users:
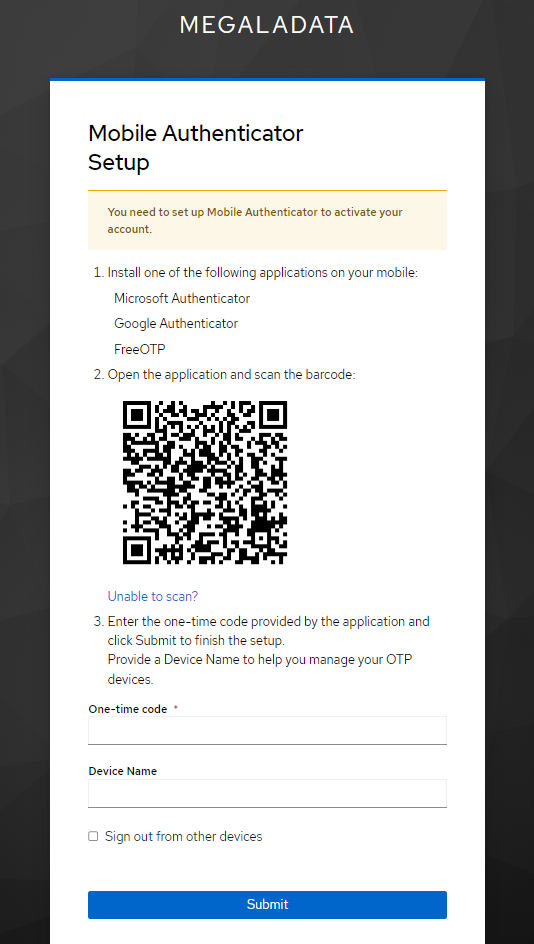
- When logging in for the first time, Keycloak prompts the user to set up two-factor authentication by scanning a QR code:
- The user scans the QR code with the authenticator app (Google Authenticator, FreeOTP, or Authy) and adds Megaladata to the list of authenticators.
- Each time the user logs into Megaladata, they enter their login, password, and the one-time code from the mobile application:
How does OTP work?
- The application generates a temporary one-time code with a lifetime of 30 seconds.
- When the user enters the code, Keycloak verifies it and allows the user to enter the system.
This completes the Keycloak setup. Let's move on to Megaladata settings.
Configuring Megaladata
If everything was done correctly in the previous step, the Megaladata setup will be fast and simple.
To set up the OpenID login, log in to Megaladata under the administrator account. Go to Navigation > Parameters and specify the necessary OpenID parameters:
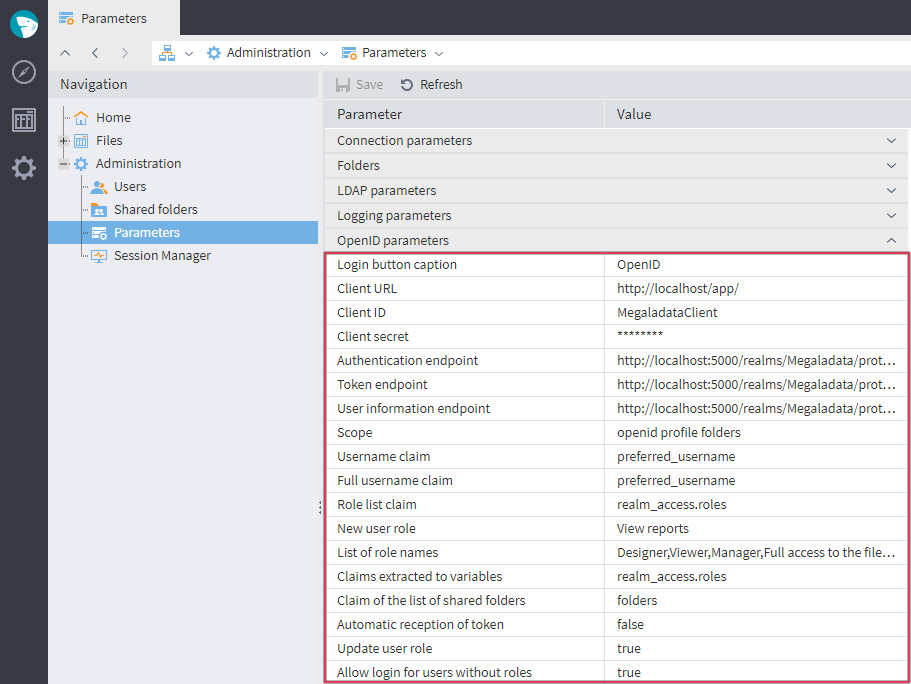
Setting up OpenID parameters in Megaladata
The table below shows the parameters, their description, and how they map with Keycloak.
| Parameter | Description | Mapping with Keycloak |
| Login button caption | The text that appears on the OpenID login button | - |
| Client URL | The URL to which Keycloak will return the response after authentication. Typically, this is the URL of the Megaladata homepage. | Must match the "Valid redirect URIs" specified in the client settings in Keycloak |
| Client ID | A unique client identifier (client_id) |
The name of the OpenID Connect client in Keycloak. In this example, "MegaladataClient". |
| Client secret | Client secret key (client_secret). Used to authenticate Megaladata when requesting tokens. |
You can see it in the "Credentials" tab in the Keycloak client settings. |
| Authentication endpoint | The URL to which Megaladata redirects the user to authenticate. | Format: {host_name}/realms/{realm_name}/ protocol/openid-connect/auth |
| Token endpoint | The URL where Megaladata requests the access token and the ID token | Format: {host_name}/realms/{realm_name}/ protocol/openid-connect/token |
| User information endpoint | The URL at which Megaladata requests additional data about the user | Format: {host_name}/realms/{realm_name}/ protocol/openid-connect/userinfo |
| Scope | A set of permissions that determine what data about the user will be requested | By default it is openid and profile. This example also uses the additional attribute folders configured in Keycloak. |
| Username claim | The token key containing the user login | "Username" |
| Full username claim | The full name of the user that will be displayed in the Megaladata profile | "First name" or "Last name" |
| Role list claim | A token key containing a list of user roles | Usually, realm_access.roles |
| New user role | The role that will be assigned to the user by default if there is no list of roles in the token. | We have configured the default role in Keycloak, so this setting will not be required. |
| List of role names | Mapping Megaladata roles to roles defined in Keycloak | Role mapping in Keycloak (example in the image below) |
| Claims extracted to variables | A comma-separated list of labels whose values are passed to scripts on the Session Variables port. | - |
| Claim of the list of shared folders | A token key containing a list of directories the user has access to. | The value of the folders attribute in Keycloak. |
| Automatic reception of token | If enabled (true), the user will be automatically redirected to the login and password entry page, without having to click the "Login with OpenID" button. |
- |
| Update user role | If enabled, Megaladata will update the user's roles and access rights at each login. If disabled, roles and access rights will be updated only at the first login, and further changes must be made manually by the administrator. | - |
| Allow login for users without roles | Allows users who do not have any roles specified in the token to log in. If disabled, such users will not be able to log in. | - |
To map Megaladata and Keycloak roles, you can use a graphical editor:
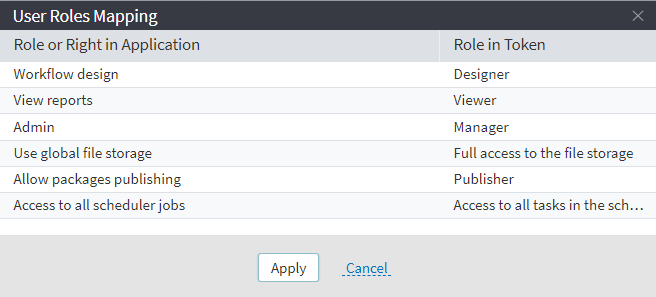
Mapping Megaladata and Keycloak roles
The authentication, authorization, and additional user information endpoints can be found in the Keycloak settings: Realm Settings > General > OpenID Endpoint Configuration.
After entering the settings, you will be able to log in to Megaladata via OpenID:
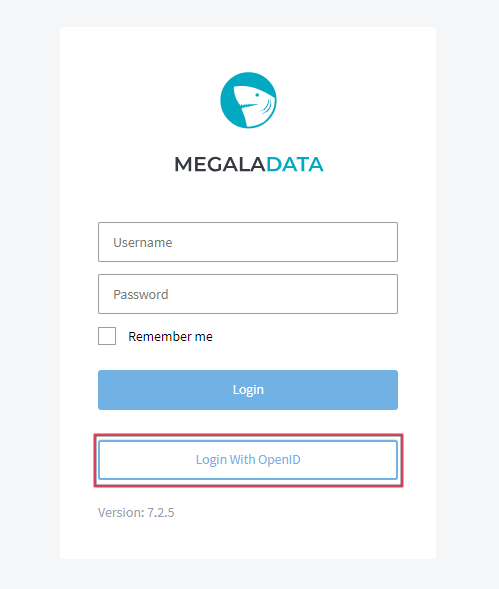
Entering Megaladata with OpenID
When you click the button, you are redirected to login via Keycloak:
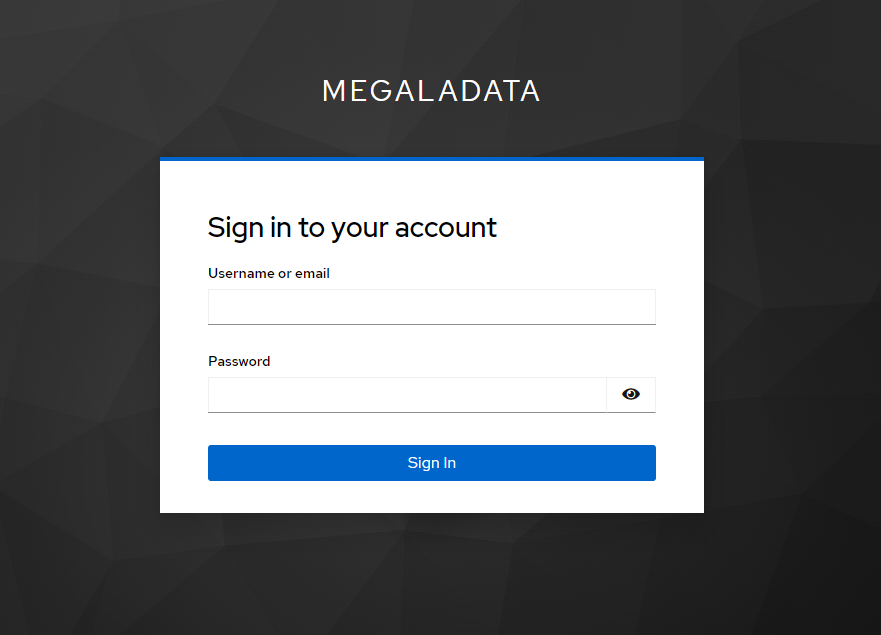
Redirect to Keycloak login
Now you can enter the login and password (as set in Keycloak) to log into Megaladata.
It is also possible to remove the standard Megaladata login window by using an additional configuration option. In this case, the user will be immediately transferred to the Keycloak login page. To do this, edit the configuration file server.json (in our case, it is located at the path /var/www/Megaladata) by adding the following line: "openid": "force". Here is how it looks:
{
"wsport": null,

"host": null,

"openid": "force"
}
Now the user won't see the standard Megaladata login page. When trying to log in, they will be immediately redirected to the Keycloak login page.
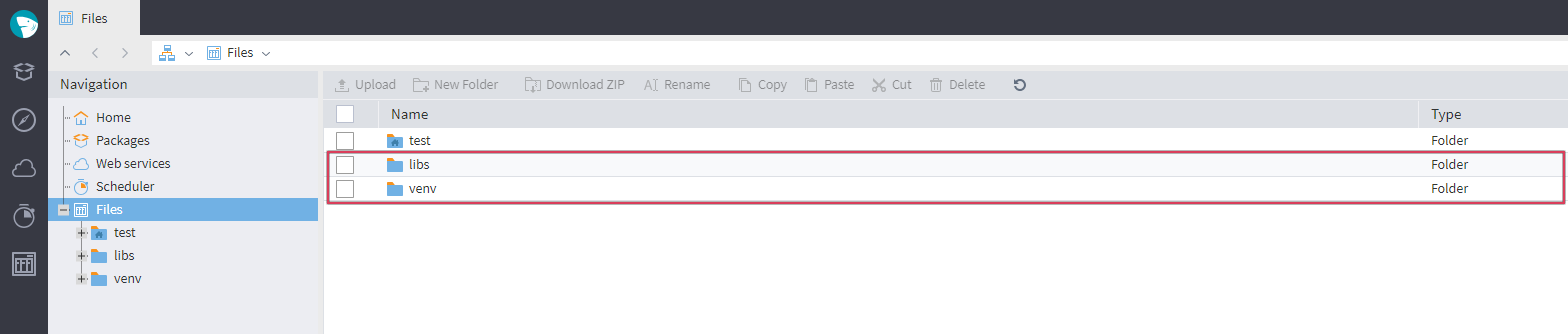
Specifics of working in Megaladata with OpenID
The user will have access only to the folders specified in the Keycloak settings, and will only be able to perform the actions defined in the role model:
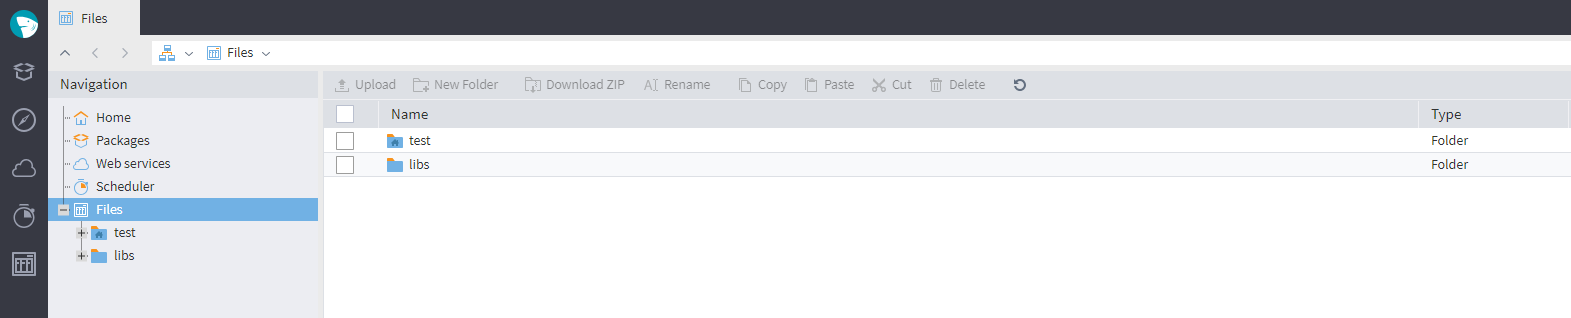
Folders accessible to a user in Keycloak
If you followed the configuration in this example, then when changing the role in Keycloak (for example, to "Manager") the changes will be automatically applied the next time the user authenticates:

Setting a manager role Keycloak login
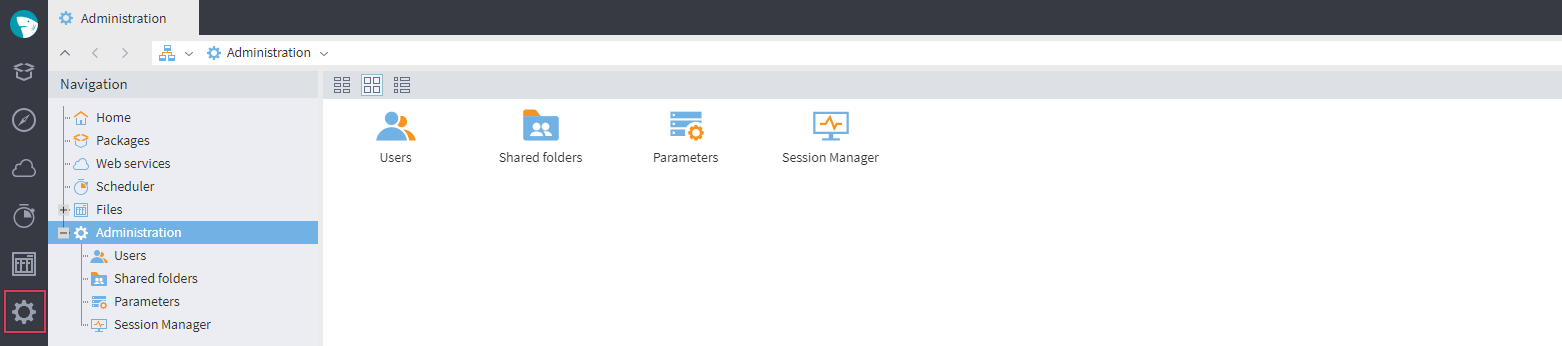
Reviewing the roles in Megaladata
Similarly, you can add new folders available to the user:
Adding accessible folders in Keycloak
Reviewing the available folders in Megaladata
After setting up OpenID Connect, Megaladata authentication and authorization via Keycloak will follow this scenario:
- If the user is not registered in Megaladata, they will be automatically registered, and their basic information (login, name, roles, and folder access rights) will be obtained from the token and user information endpoint.
- If the user already exists in Megaladata, and their parameters match those received from Keycloak (roles and access to folders), they will log in to the system without noticing any changes.
- If the user exists in Megaladata and the Update user role option is enabled in the OpenID settings, upon changing the user's roles or access permissions in Keycloak Megaladata will automatically update the information and apply the new access settings.
- If the user was created manually in Megaladata, you will need to enable a specialized setting to transfer control of the user profile to Keycloak:
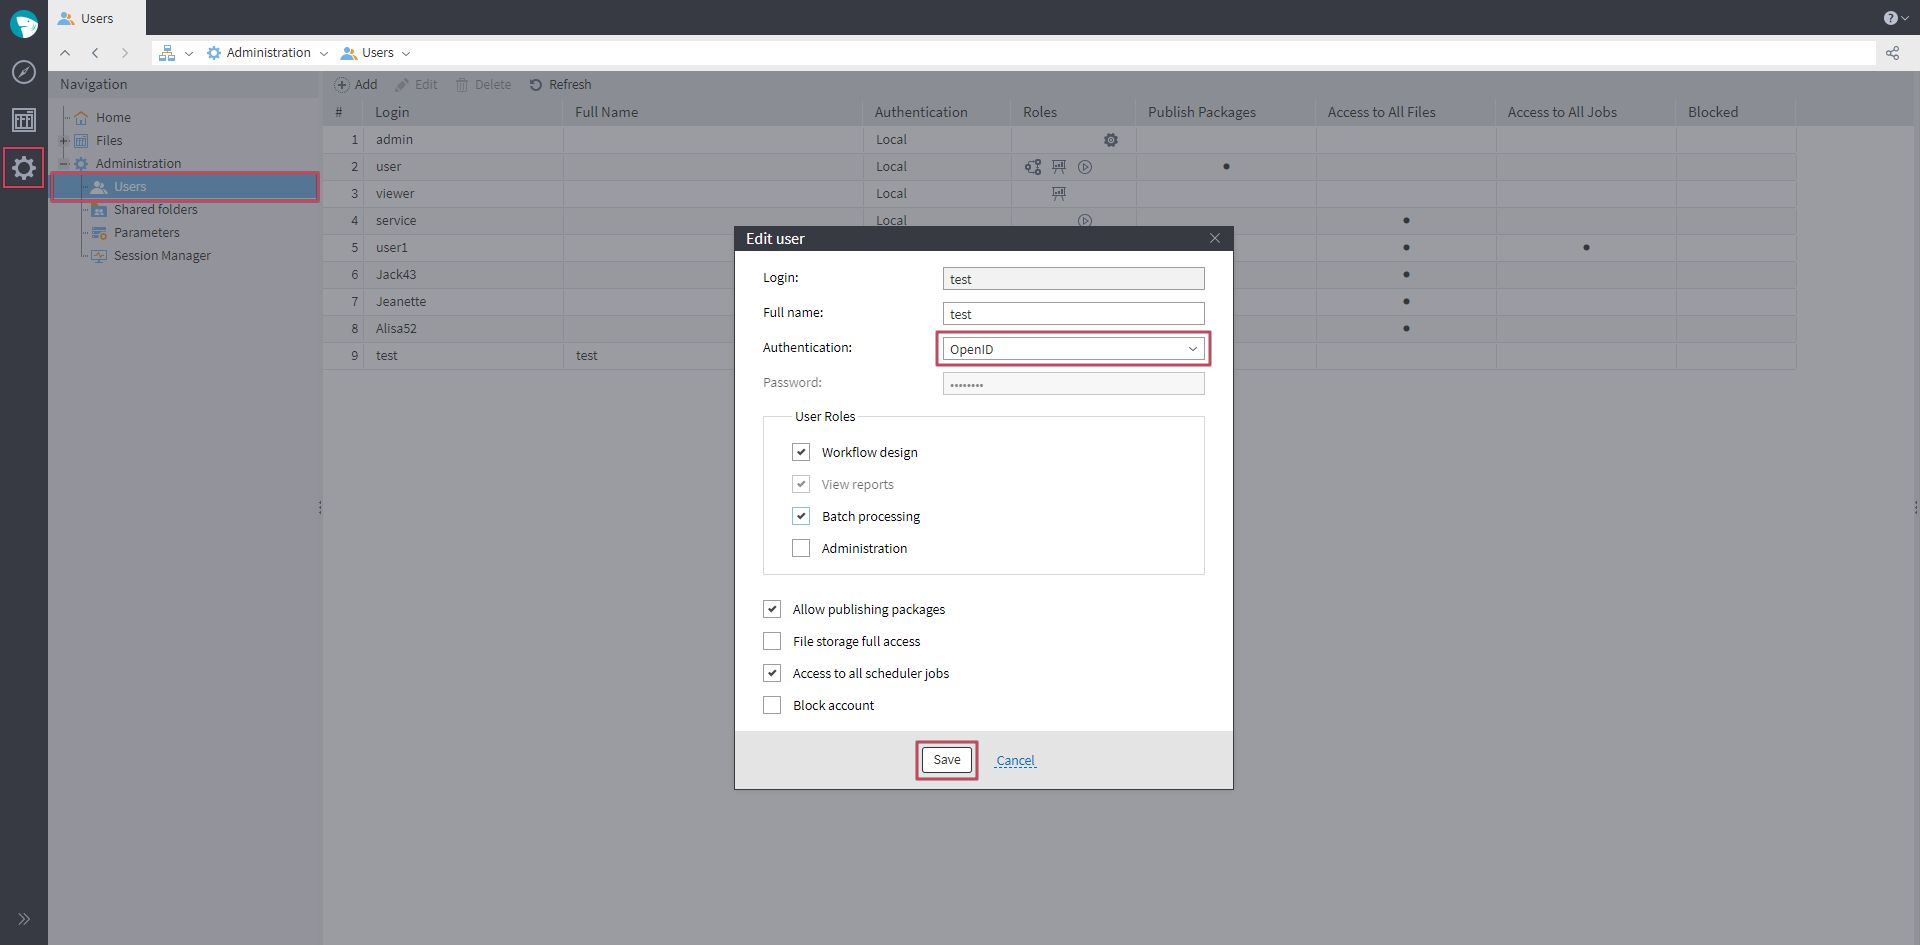
Transferring user profile control from Megaladata to Keycloak
How to disable login to Megaladata with OpenID
If for some reason you need to disable login to Megaladata using OpenID, you can clear the contents of client_id in the administration pane. Login will be disabled automatically.
If the server.json configuration file has been edited, you first need to return it to its original state by removing the added line "openid": "force".
In conclusion
Setting up OpenID Connect in Megaladata via Keycloak allows you to centrally manage users, ensuring secure and convenient login. It saves you from manual account creation and configuration—all rights and access data will be updated automatically, and users will be able to log in using corporate credentials.
What you can do next:
- Set up SSO via Keycloak for other systems, including data sources.
- Add more attributes to be transferred to Megaladata—similar to
folders, you can transfer other user attributes and then use them as variables in your workflows (after additional Megaladata configuration). - Strengthen security with two-factor authentication. Apart from the method we have explored, you can try others.
See also

Megaladata at e-Logi Fest 2026

How Low-Code is evolving ETL
In 2026, you cannot scroll LinkedIn for five minutes without finding a post declaring "ETL is dead, ELT and AI have replaced it." It sounds compelling. It is also wrong.

Megaladata at Plug and Play Armenia Batch 3 Expo
On July 9, 2026, Megaladata took part in the Plug and Play Armenia Batch 3 Expo, the graduation event closing out the three-month International Pre-Acceleration Program in Armenia.
About Megaladata
Megaladata is a low code platform for advanced analytics
A solution for a wide range of business problems that require processing large volumes of data, implementing complex logic, and applying machine learning methods.
GET STARTED!
It's free